
How to use MultiGroupPoster — every feature, step by step
From installing the extension to reading your results: 20 short chapters, each shown on a real screen from the app.
Free plan with 6 posts. No card needed.
Updated
1Step 1
Install MultiGroupPoster from the Chrome Web Store
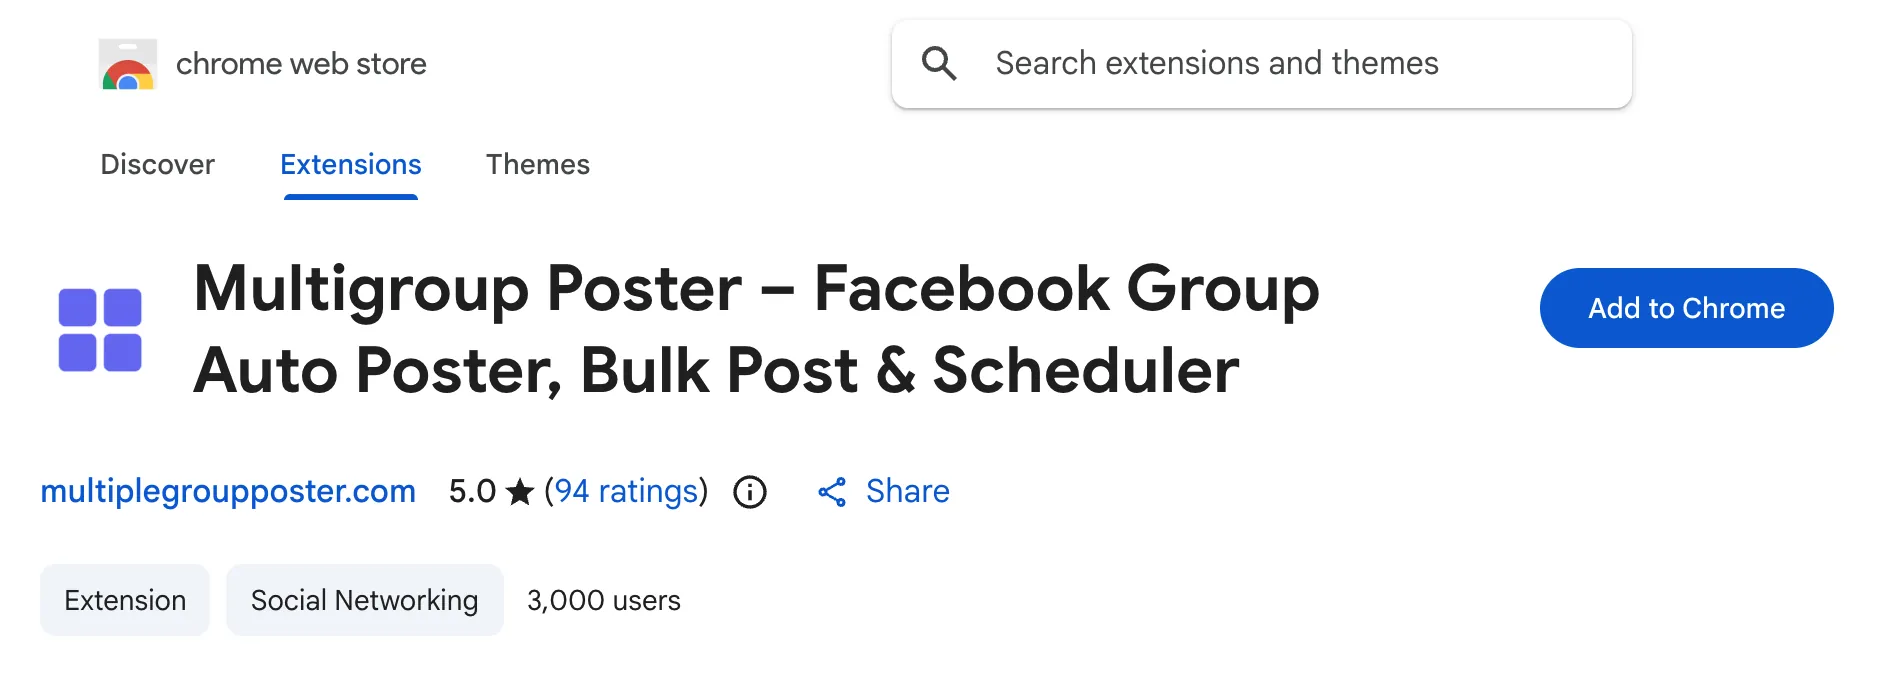
MultiGroupPoster is a Chrome extension. It works in Google Chrome and in Chromium browsers such as Edge and Brave, on Windows, Mac and Linux. Installing takes about 10 seconds.
- Open MultiGroupPoster on the Chrome Web Store and click Add to Chrome, then Add extension.
- Click the puzzle-piece icon in Chrome’s toolbar and pin MultiGroupPoster, so it is always one click away.
- Stay signed in to Facebook in the same Chrome profile. MultiGroupPoster posts through the Facebook account that is open in your browser and never asks for your Facebook password.
2Step 2
Sign in to MultiGroupPoster
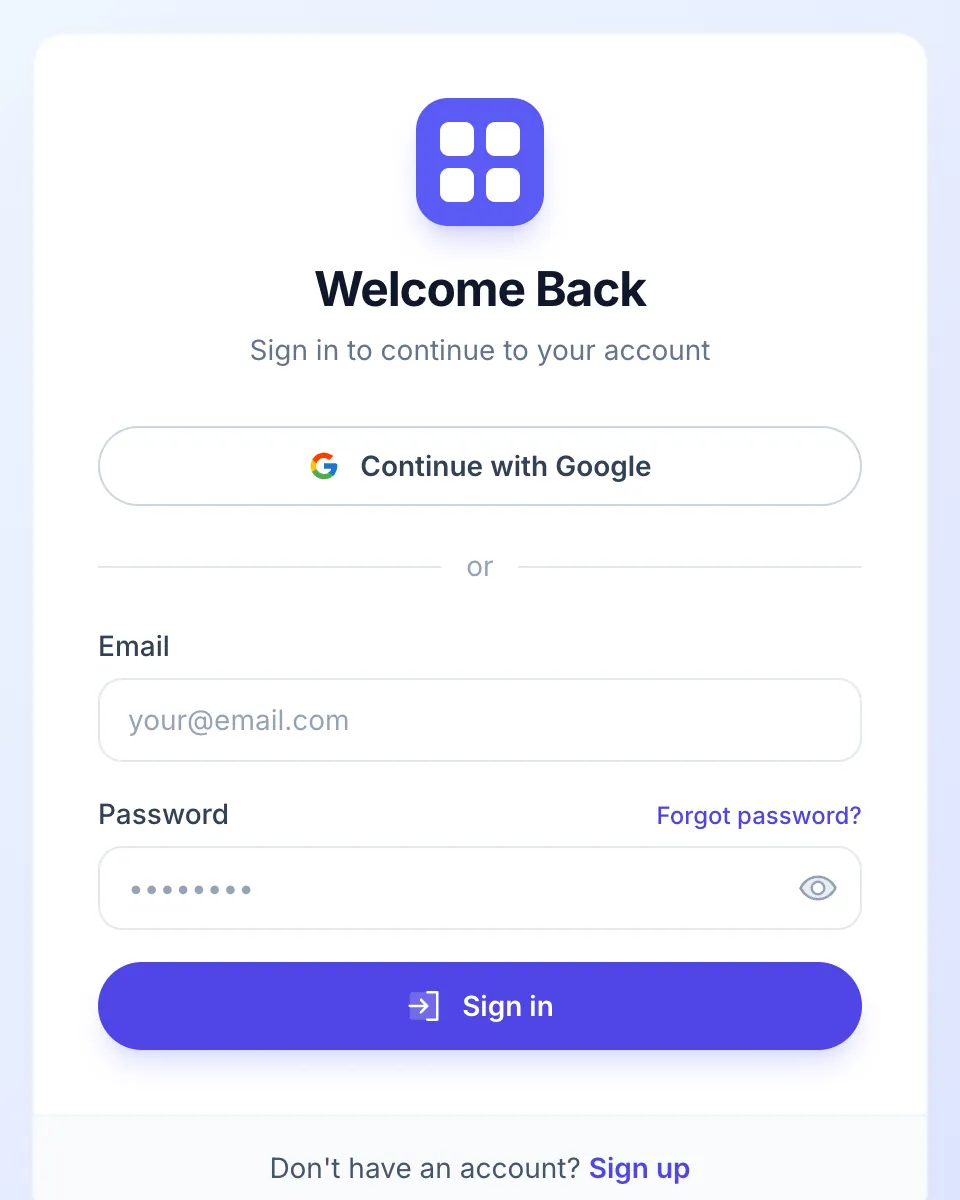
Click the MultiGroupPoster icon. The first time, it asks you to sign in to your MultiGroupPoster account. This account is separate from Facebook.
- Click Continue with Google — the quickest way — or sign in with your email and a password.
- New accounts start on the free plan with 6 posts, no card needed. You can upgrade later under Account & Billing — see the plans.
3Step 3
A quick tour of the main screen
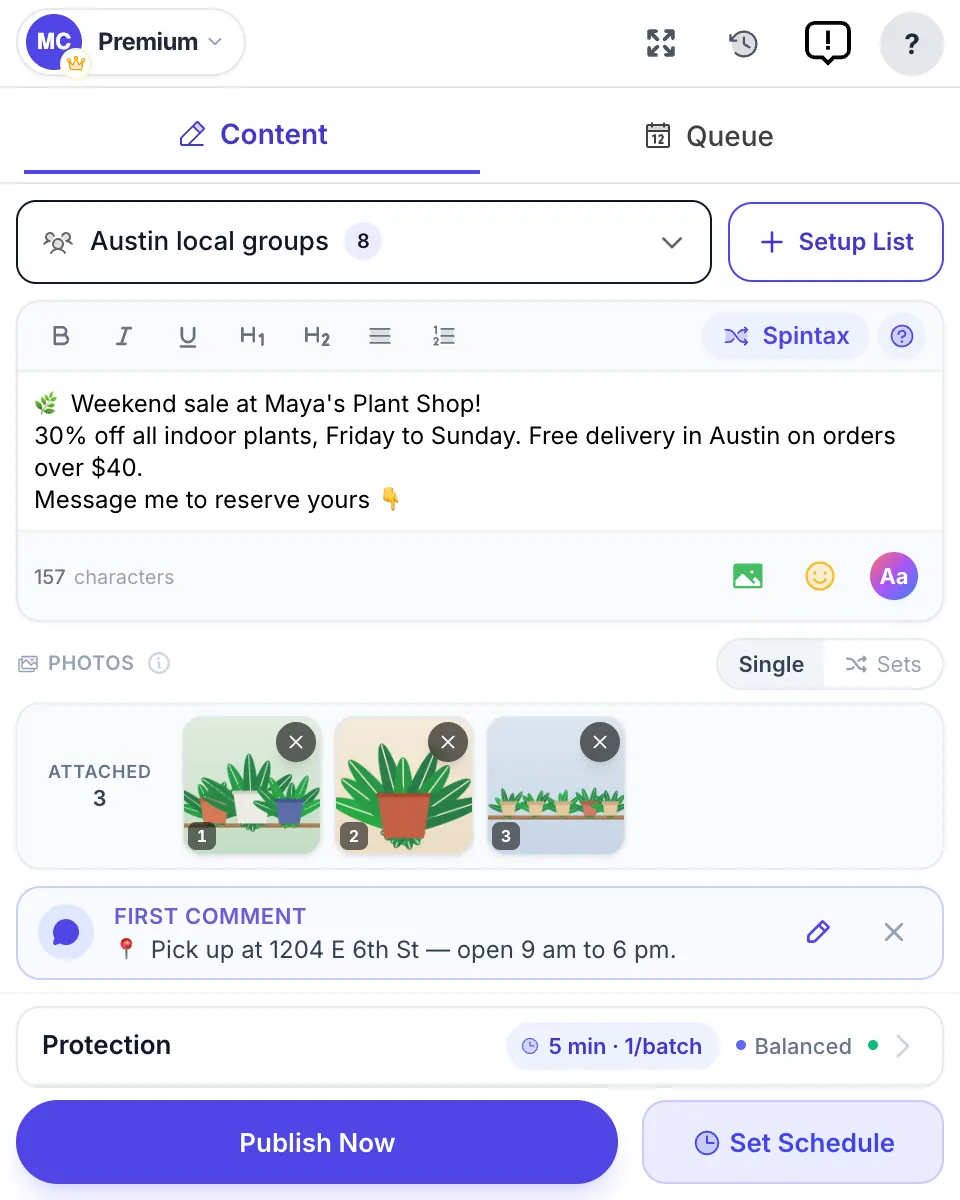
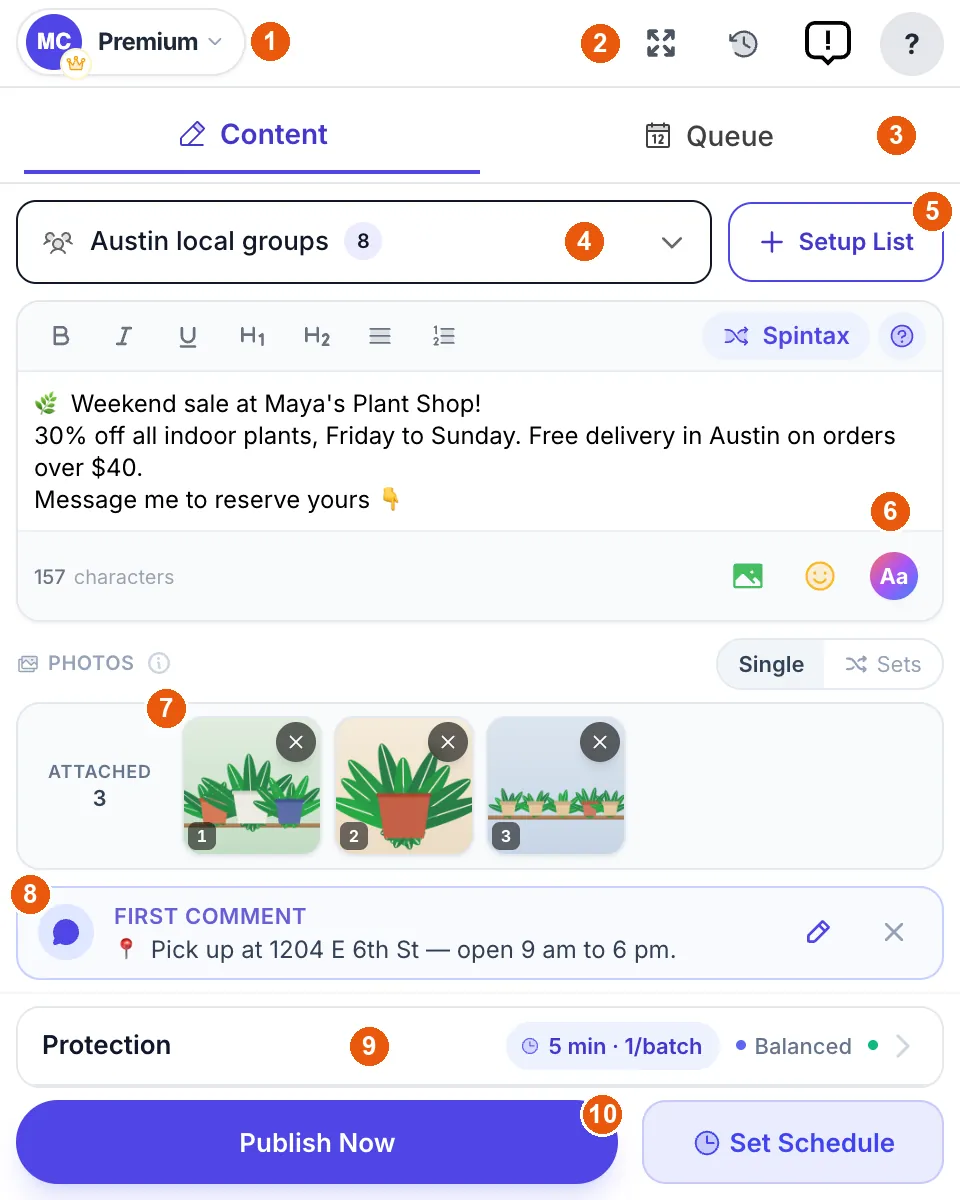
Everything happens on one screen. The numbers on the screenshot match the list below it.
- Account menu — who your posts are published as (your profile or a Page), the app language, Account & Billing and Log Out.
- Top-right icons — open a larger window, your Post history, send feedback, and help.
- Content and Queue — you write in Content; scheduled posts wait in Queue.
- Group selector — the group lists this post goes to.
- Setup List — create a group list, pick single groups, or split a big list.
- Editor — your text, with formatting, Spintax, photos, emoji and background colors.
- Photos — what is attached to the post, in order.
- First comment — the comment added under each post.
- Protection — how fast and how carefully the posts go out.
- Publish Now and Set Schedule — post now, or later.
4Step 4
Create your group lists
A group list (the app also calls it a bundle) is a saved set of Facebook groups — for example “Local groups” or “Plant lovers”. You build it once and reuse it in every post.
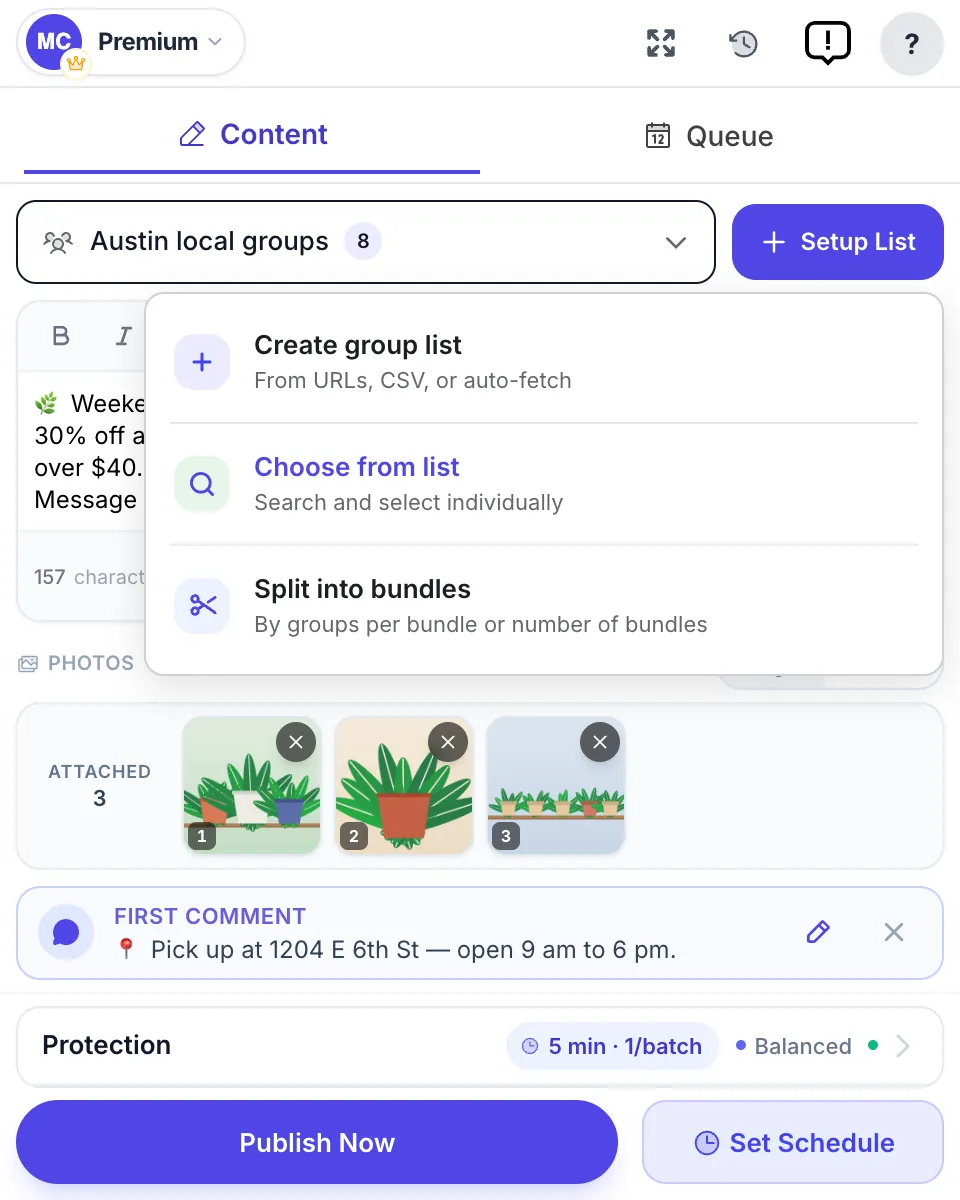
- Click Setup List, then Create group list.
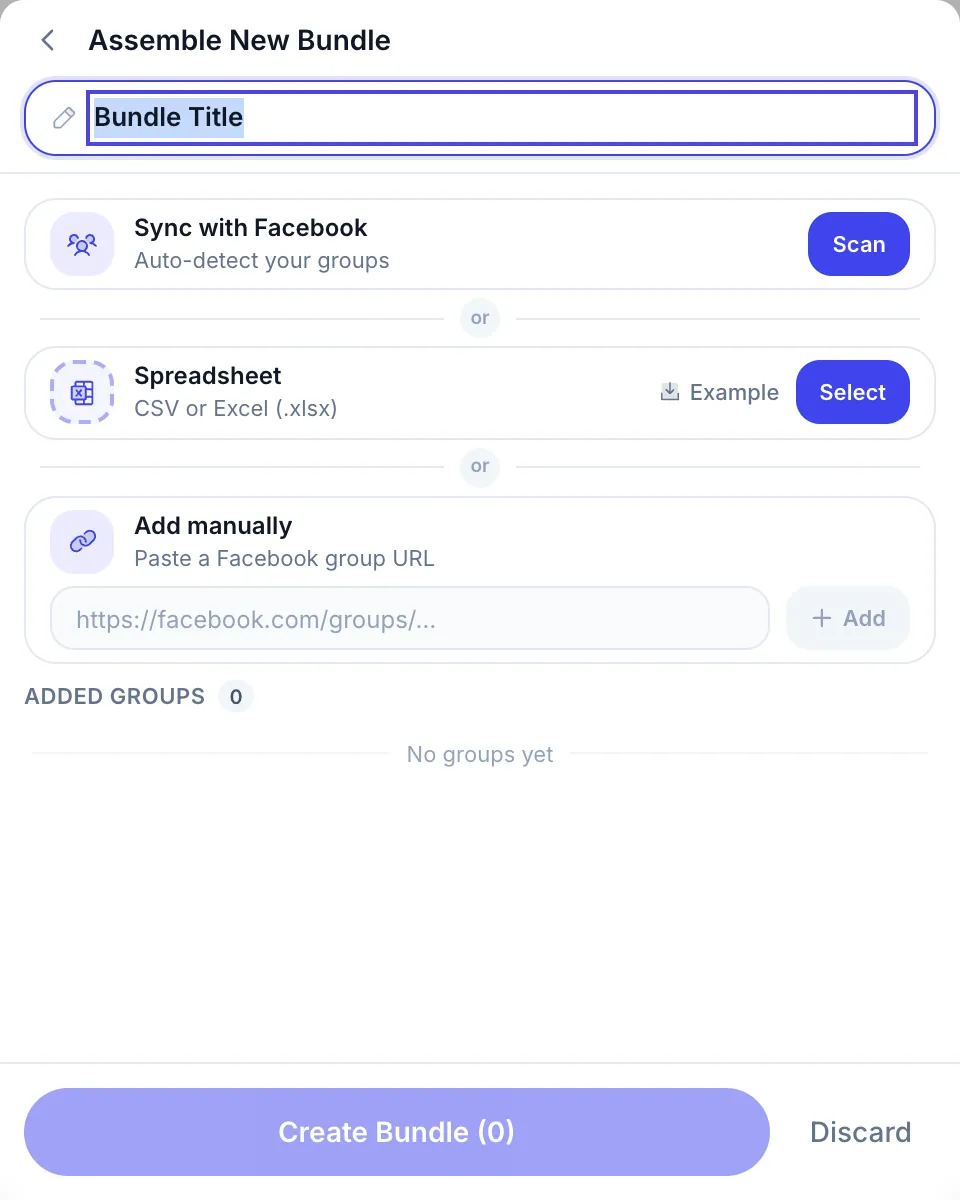
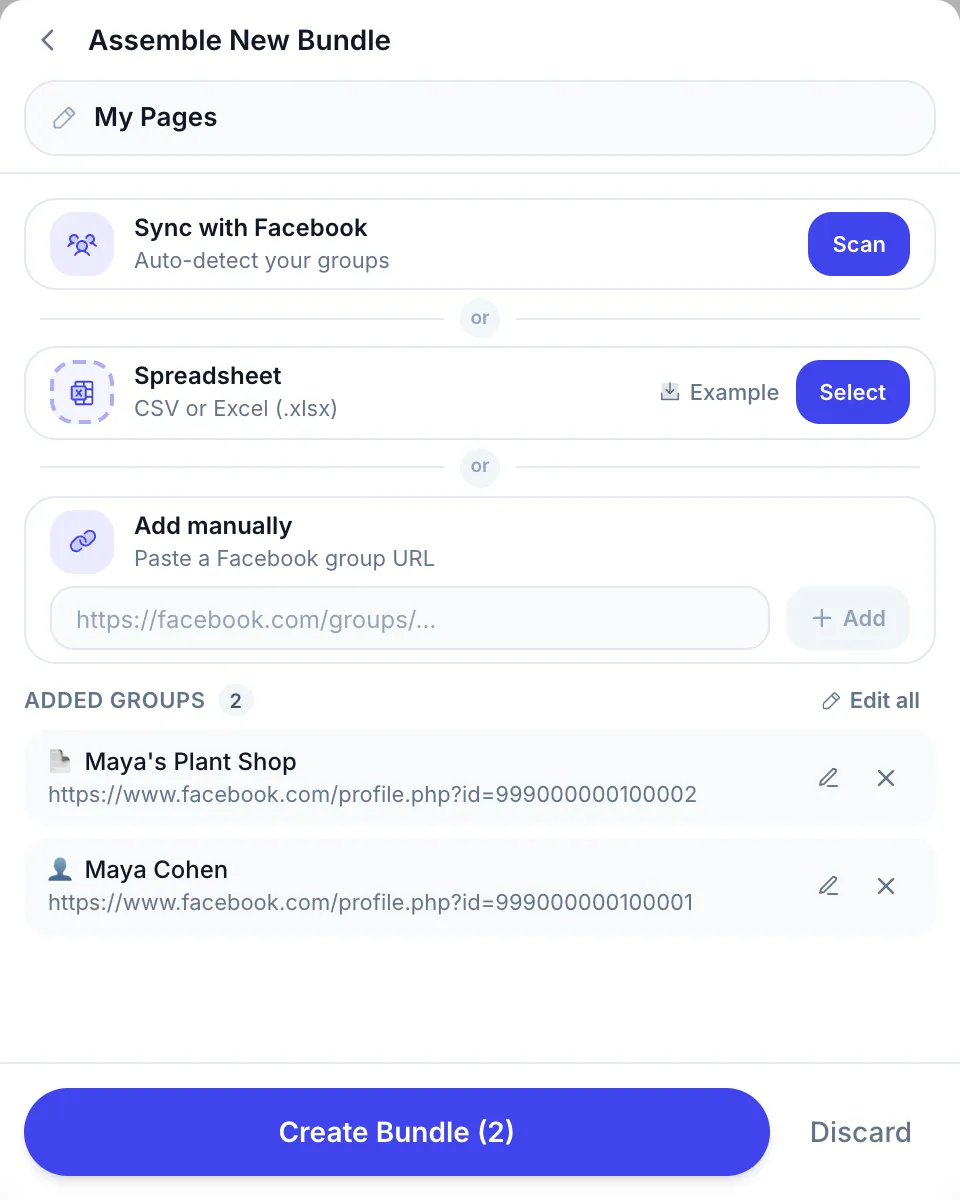
- Give the list a name, then add groups in any of three ways: Sync with Facebook → Scan finds the groups you are a member of; Spreadsheet imports a CSV or Excel file (Example shows the format); Add manually takes a group link — paste it and press Add.
- Click Create Bundle. The list now appears in the group selector.
5Step 5
Choose where this post goes
Each post can go to one or more lists, or to groups you pick one by one.
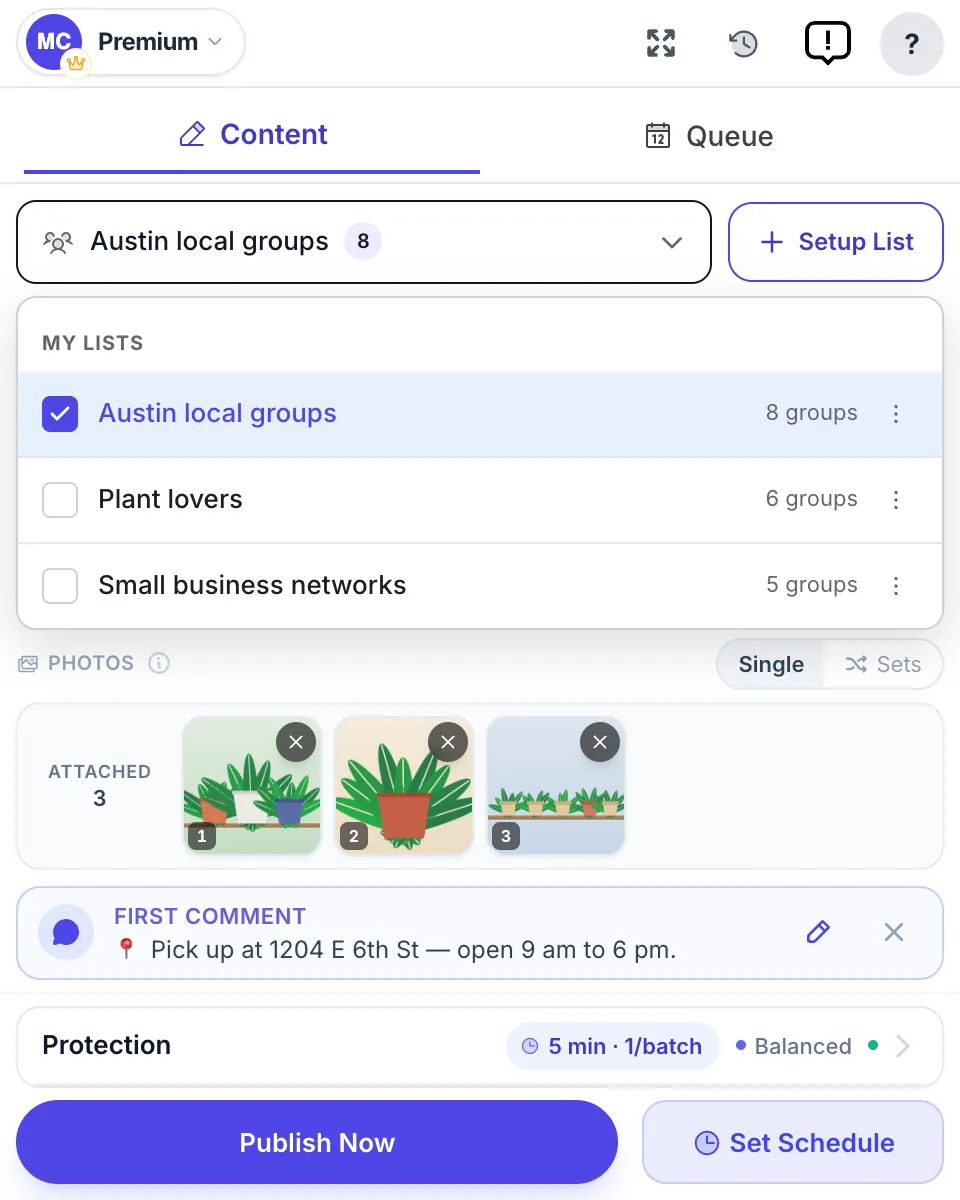
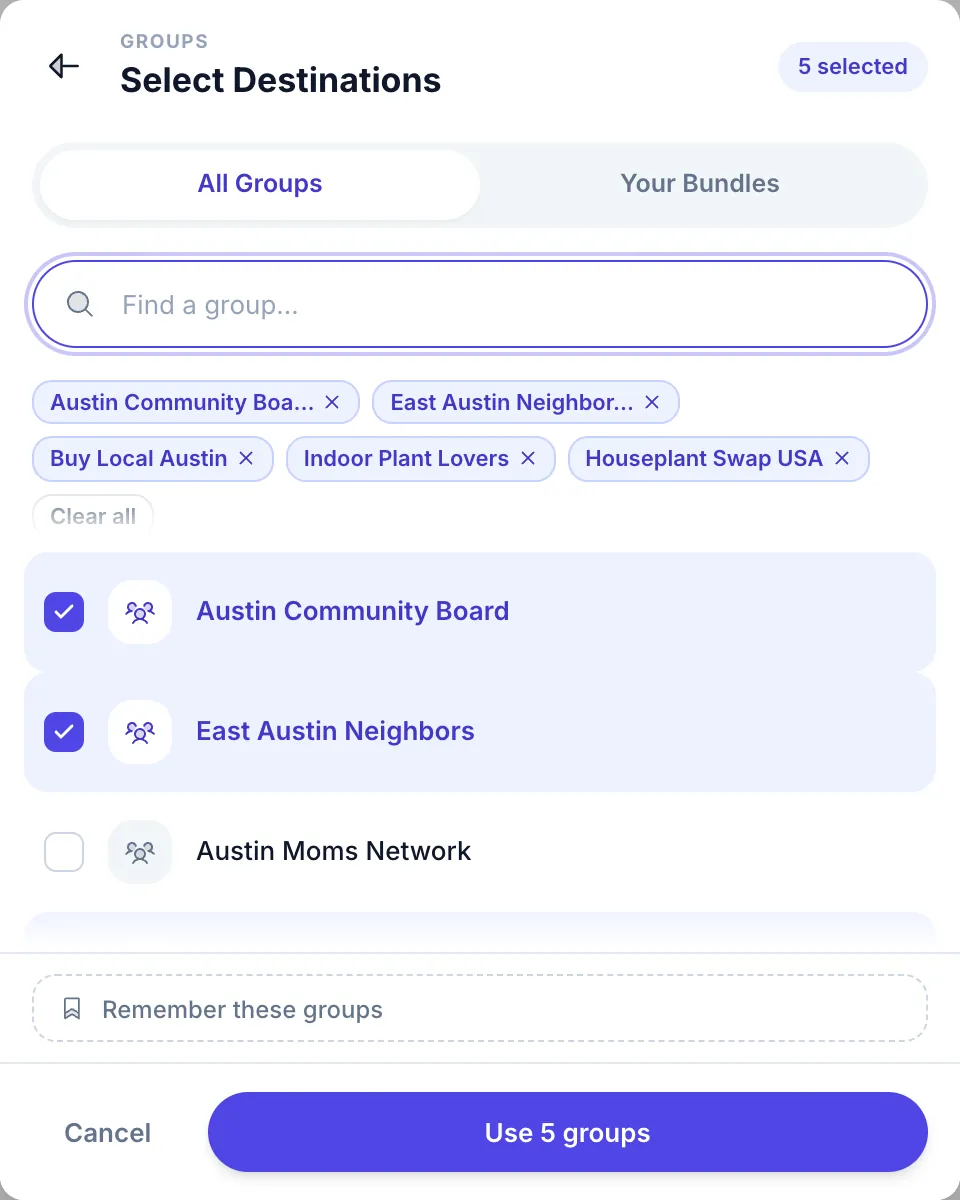
- Click the group selector and tick the lists you want. The number next to each list is how many groups it holds.
- Only some groups this time? Open Setup List → Choose from list, search by name, tick the groups and confirm. Tick Remember these groups to keep the choice for next time.
6Step 6
Post as your Facebook Page — or on its own feed
If you manage Facebook Pages, you can post to groups as a Page instead of your personal profile — and you can post on a Page’s own feed, too.
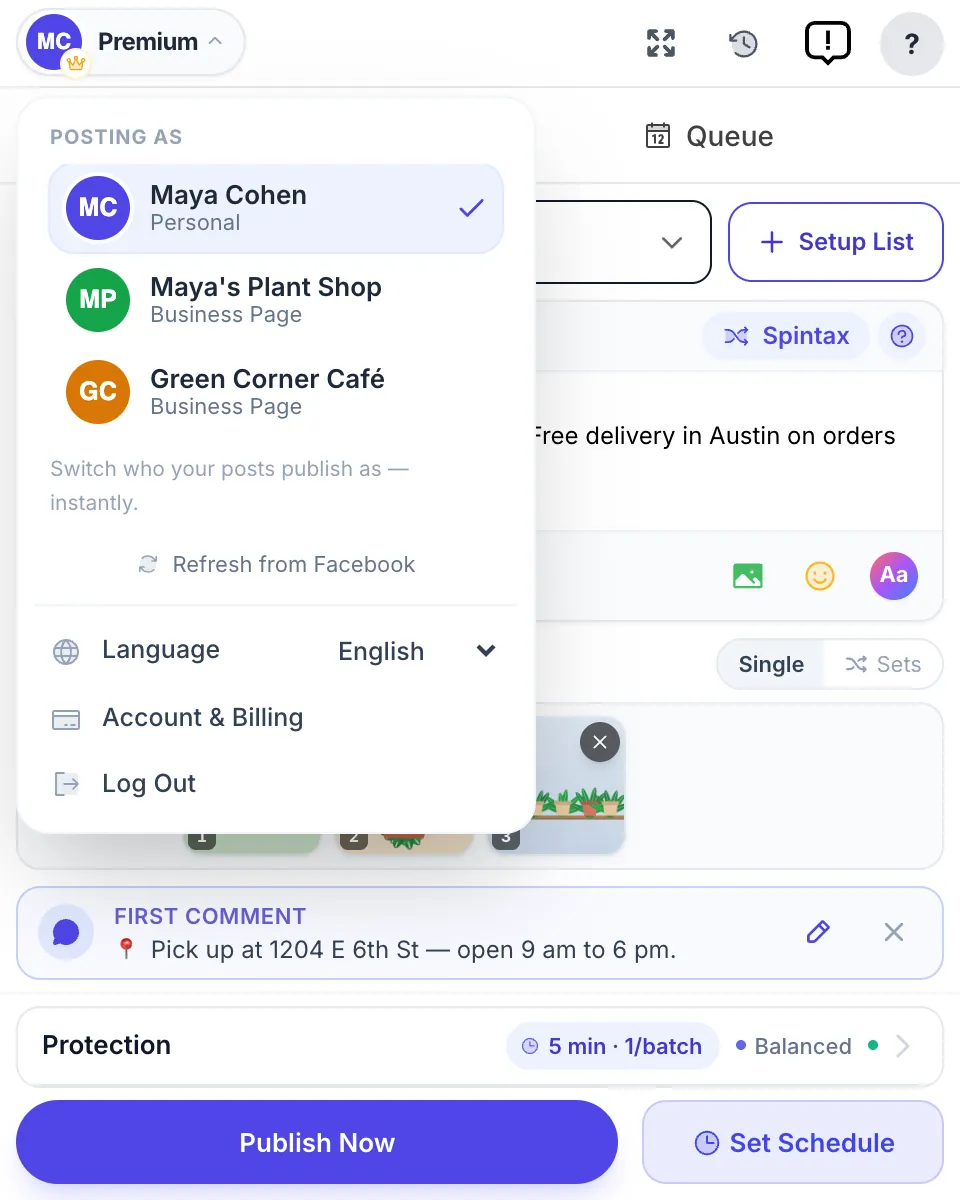
- Open the account menu at the top left. Under Posting as you see your profile and the Pages you manage.
- Click the one you want to post as. The switch is instant, and the next post goes out under that name.
- A Page is missing? Click Refresh from Facebook.
- To post on a Page you manage — on its own feed, not in a group — open Setup List → Create group list, paste the Page’s link under Add manually and press Add. The Page shows up with a 📄 icon. Your own profile link (👤) works the same way.
- Pick this list for a post like any other. Each Page gets the post from the Page itself, always in Fast mode, and a Page you don’t manage is refused before anything is sent.
7Step 7
Write your post
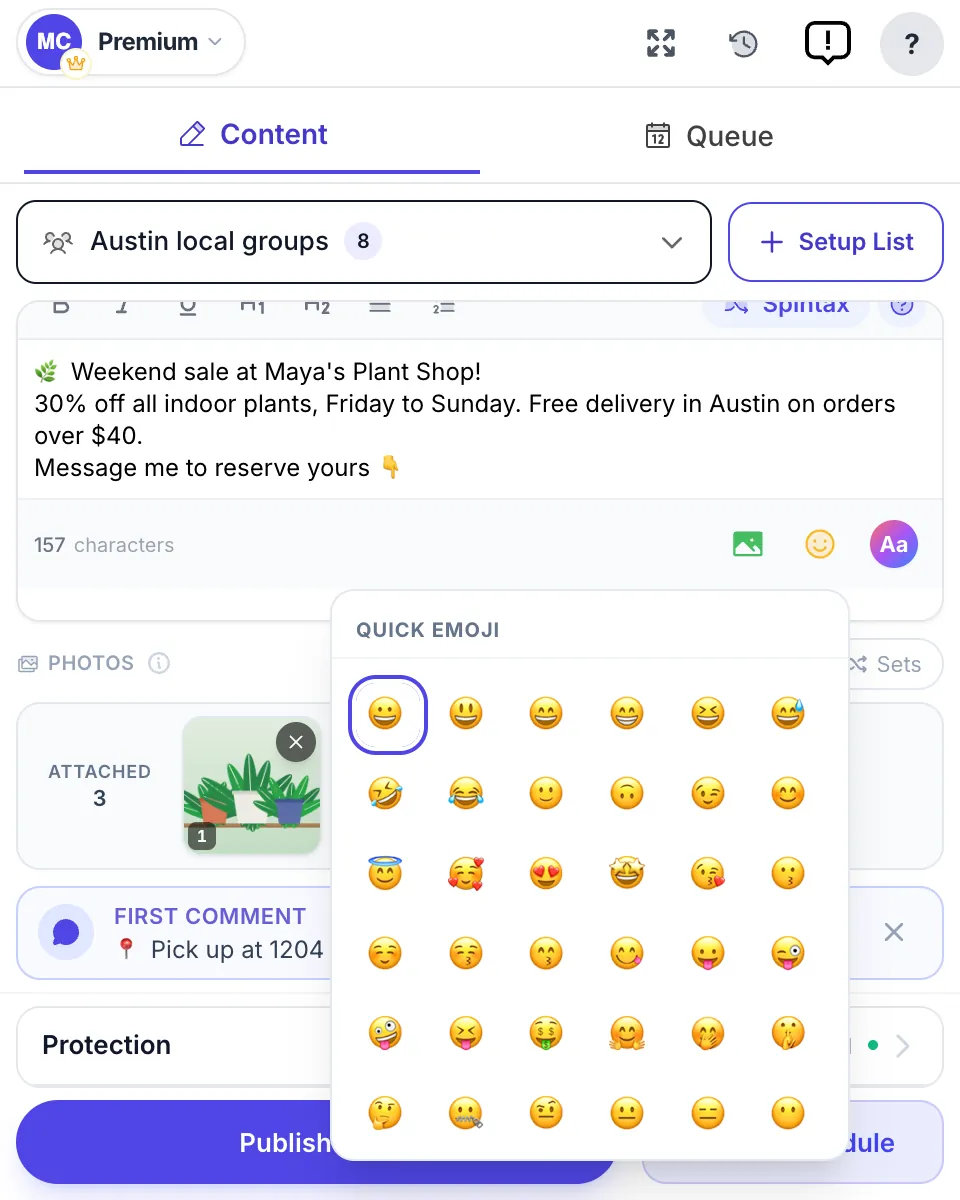
Type in the editor just as you would on Facebook.
- Use the toolbar for bold, italic, underline, headings and lists.
- Click the smiley for emoji. The counter under the text shows how many characters you have used.
- Paste a link and it becomes a preview card on Facebook, like when you post by hand.
8Step 8
Add photos and videos — or Image Sets
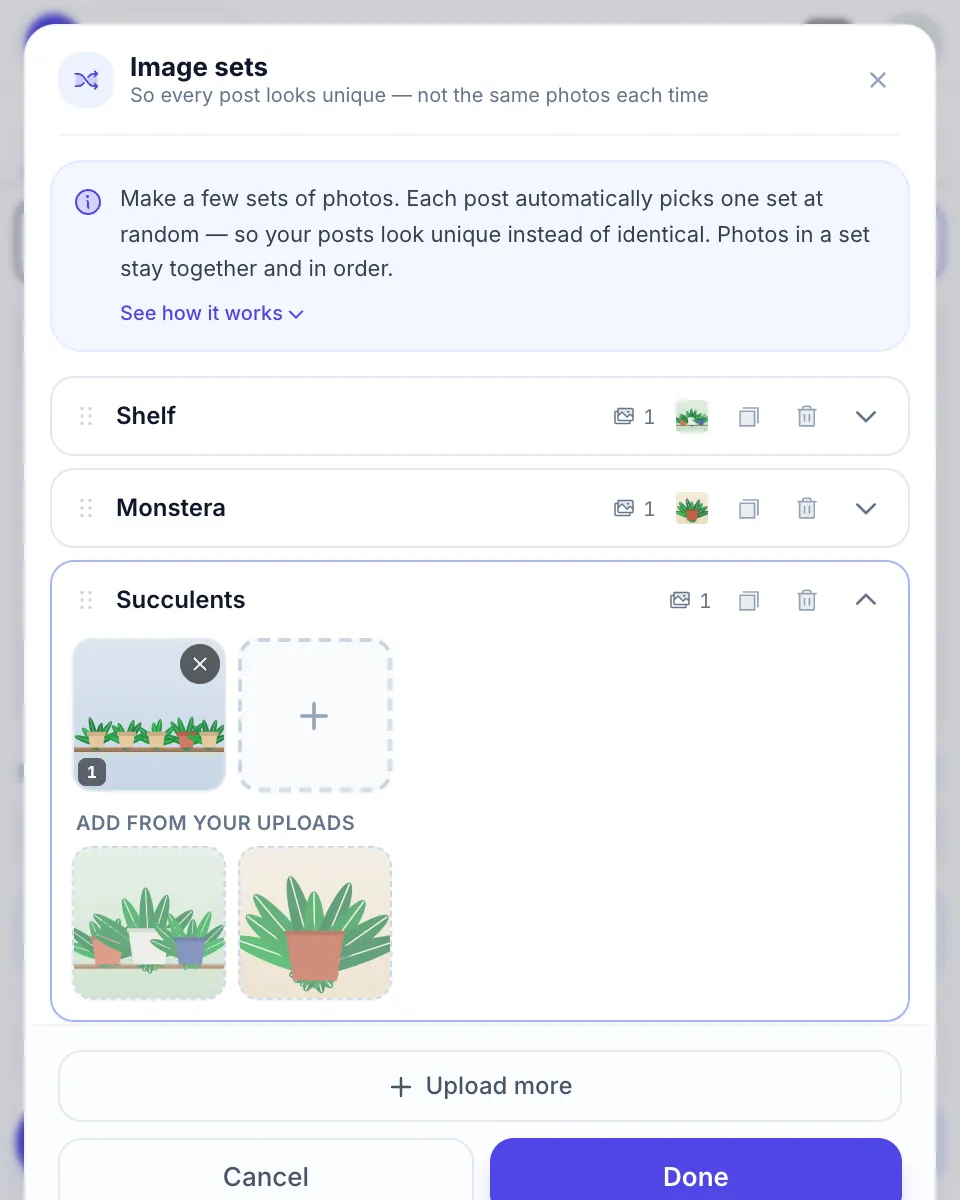
Attach photos or a video with the green photo button. The numbers on the thumbnails are the order they appear in the post.
- Click the green photo button and choose your files. Remove one with its ✕.
- Switch Single to Sets to make Image sets: a few groups of photos. Each post picks one set at random, so your groups don’t all get the same photos.
- In each set, add photos from your uploads or with Upload more, then click Done.
9Step 9
Colored background posts
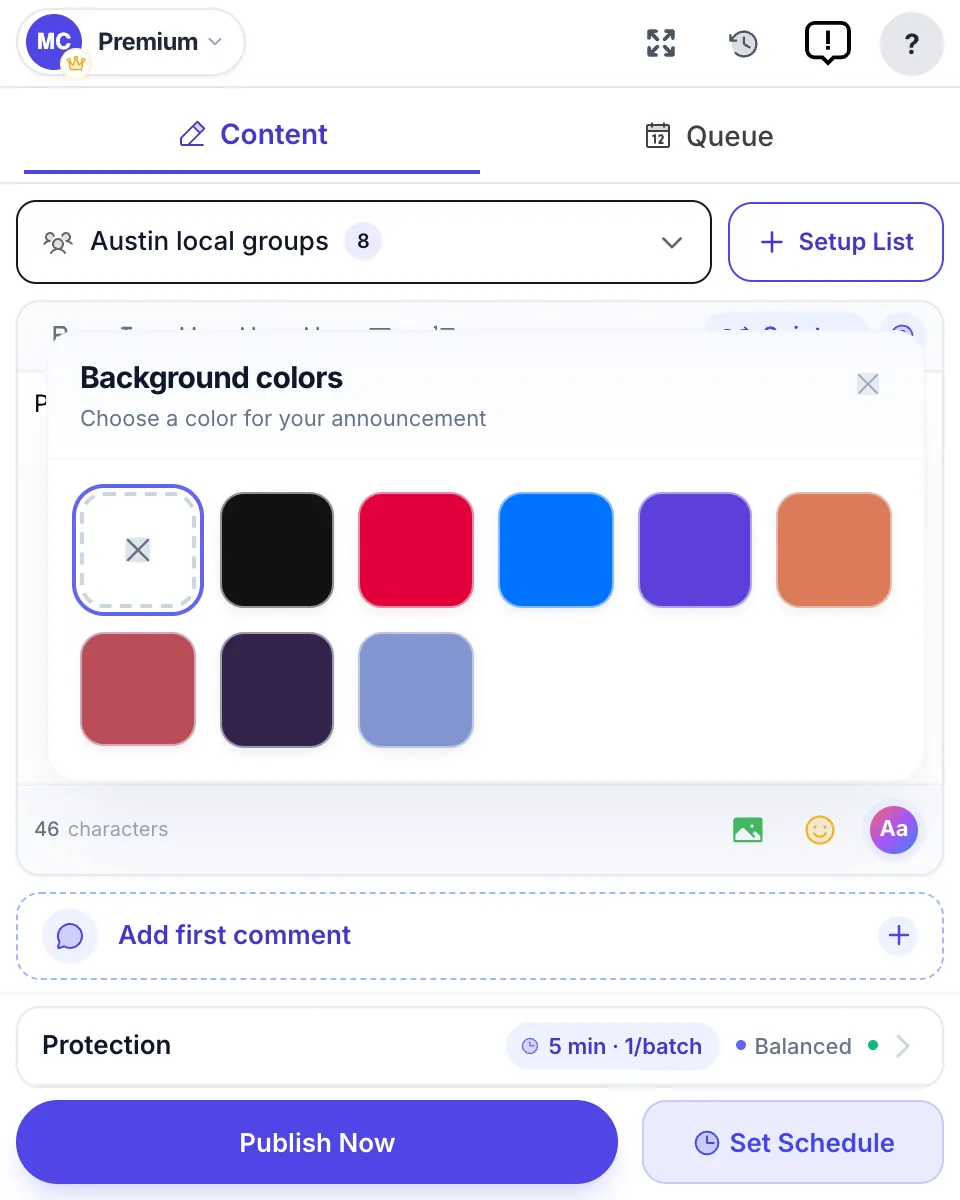
A short text-only post can go out on a colored background, like the ones on Facebook itself.
- Click Aa and pick a color.
- It works for text only: up to 130 characters and 3 lines, with no photos.
10Step 10
Spintax: a different version for every group
The same text in dozens of groups looks copy-pasted — and it is an easy pattern for Facebook to flag. Spintax gives each group its own wording.
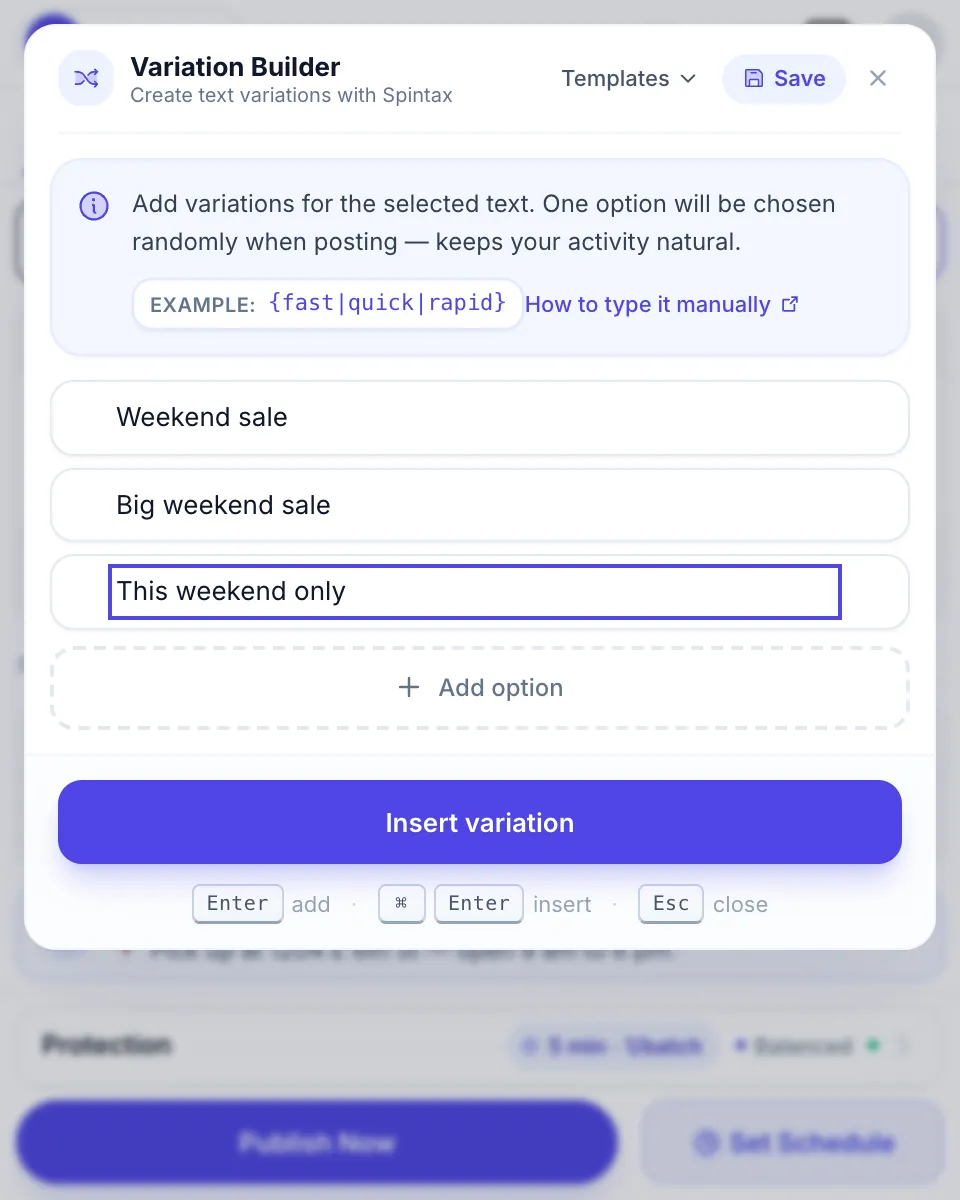
- Select a word or a sentence and click Spintax. The Variation Builder opens.
- Write two or more options — for example “Weekend sale”, “Big weekend sale”, “This weekend only” — and click Insert variation.
- Or type it yourself:
{Weekend sale|Big weekend sale}. Each group gets one option at random.
11Step 11
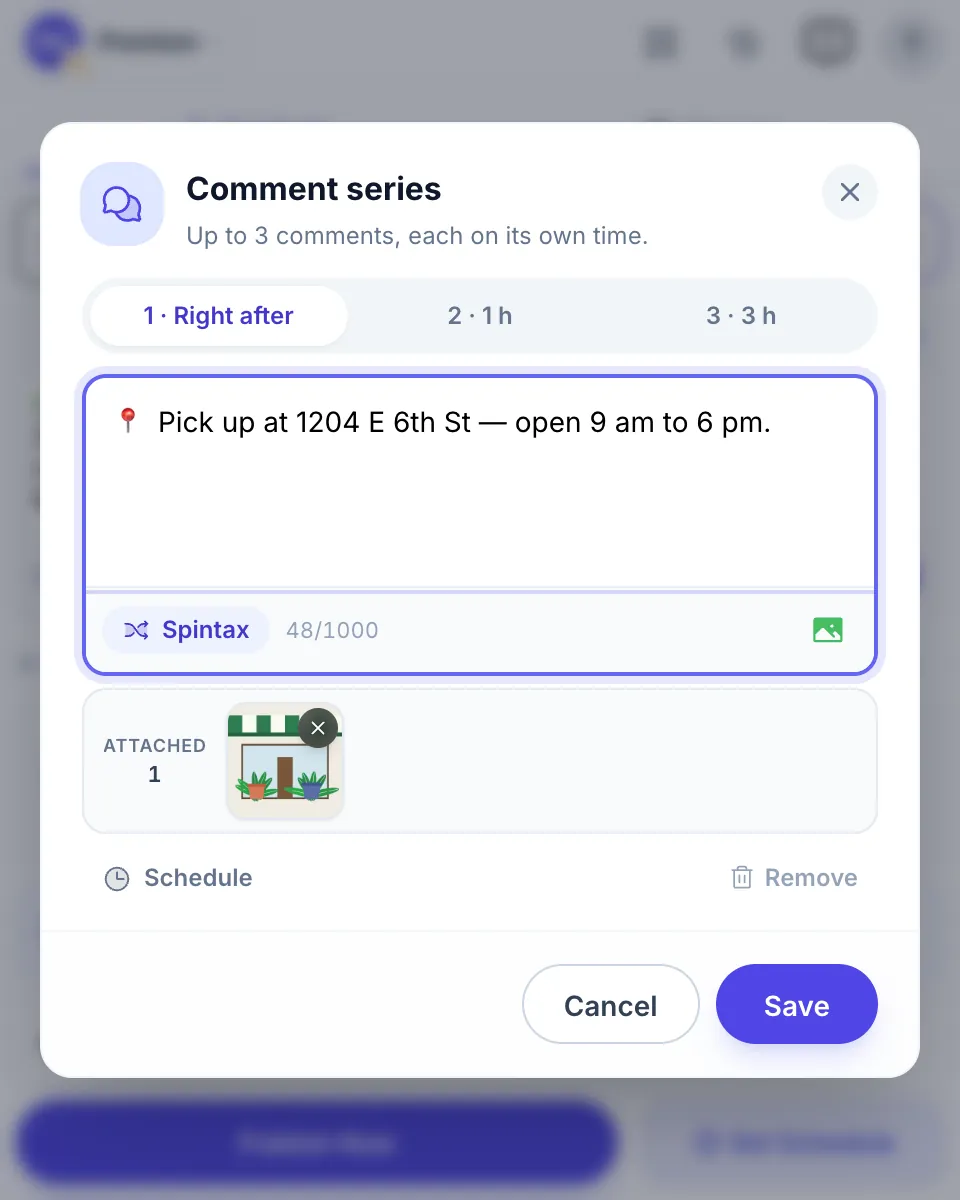
Add a first comment — right away, later, or as a series
A first comment appears under each post. It is the right place for a link, an address or hashtags. Read more about the first comment.
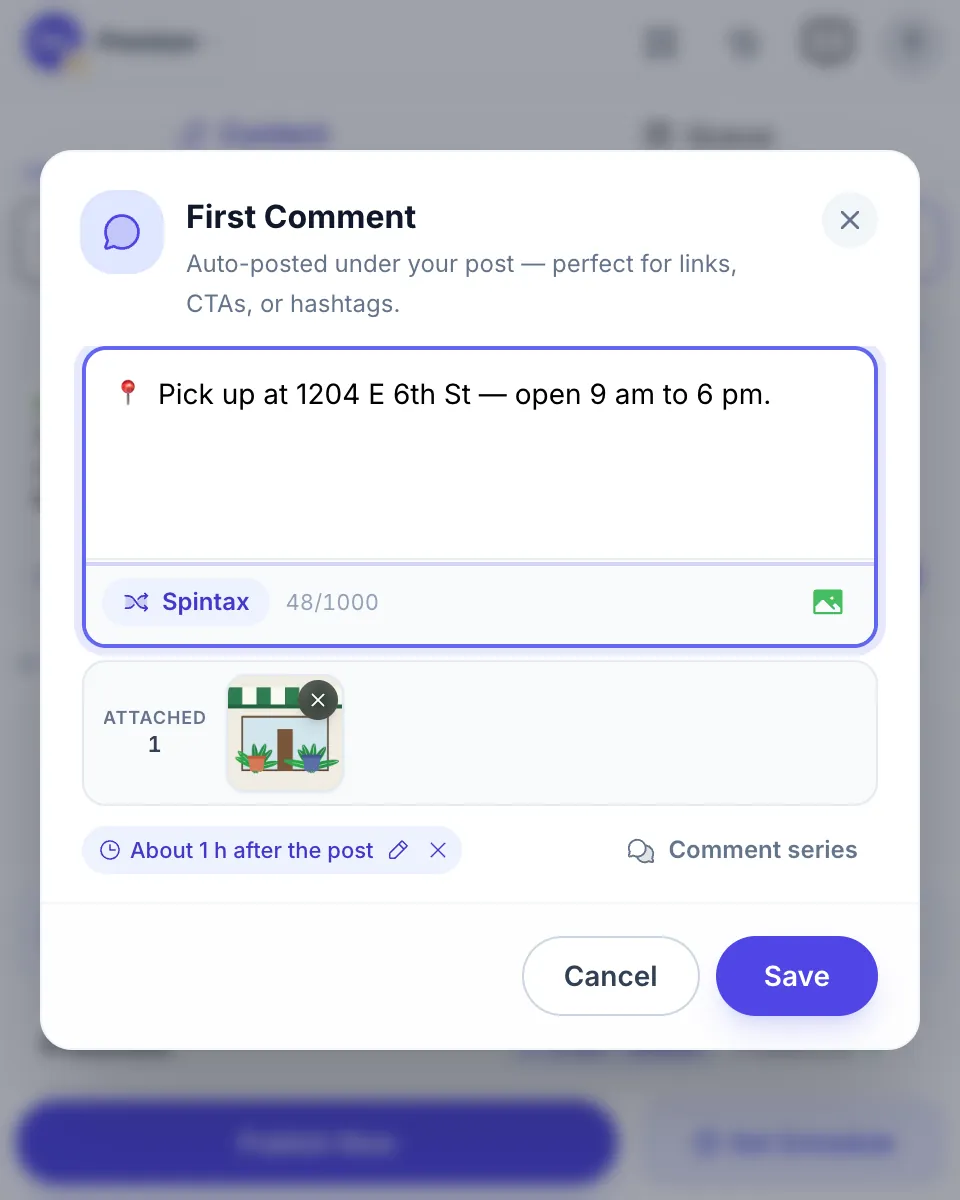
- Click Add first comment under the editor and write it. Spintax works here too, and you can attach one photo.
- By default it is posted right after each post. Click Schedule to post it later: 15 minutes, 1 hour, 3 hours or a custom time after each group’s post.
- Click Comment series to add up to 3 comments, each at its own time, at least 10 minutes apart.
- Keep Chrome open until the comments are due. Post history shows the ones still waiting.
12Step 12
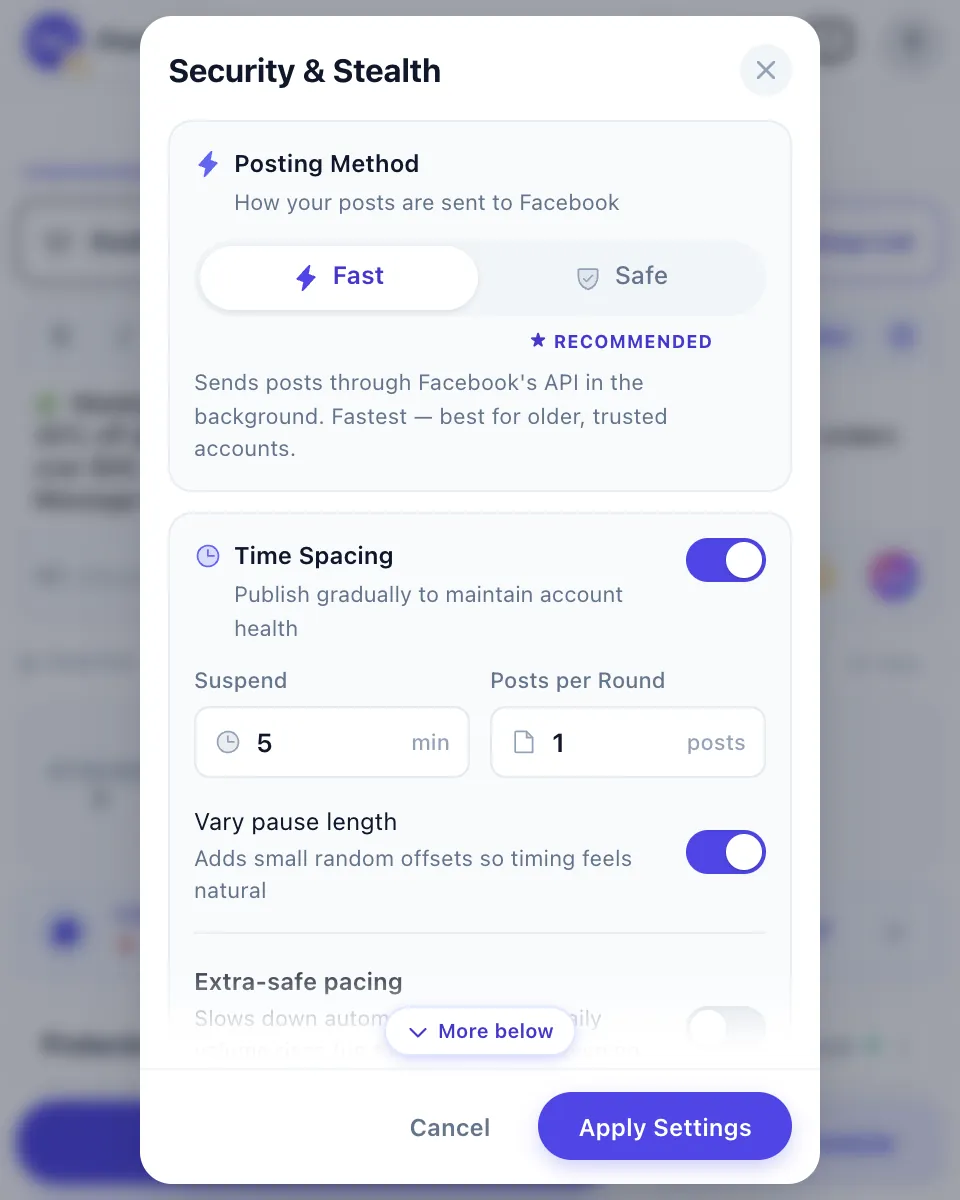
Protection: how your posts are sent
Click Protection to decide how fast and how carefully the campaign runs.
- Posting Method: Fast sends the posts through Facebook in the background — the quickest way. Safe, marked Recommended, opens Facebook and posts on screen, like a person — slower, and the window has to stay open.
- Time Spacing: pause for a few minutes after every few posts. Vary pause length makes each pause a little different.
- Extra-safe pacing slows down automatically as your daily volume grows. Natural Presence varies the timing between posts, and Randomize group order changes the order of the groups on every run.
13Step 13
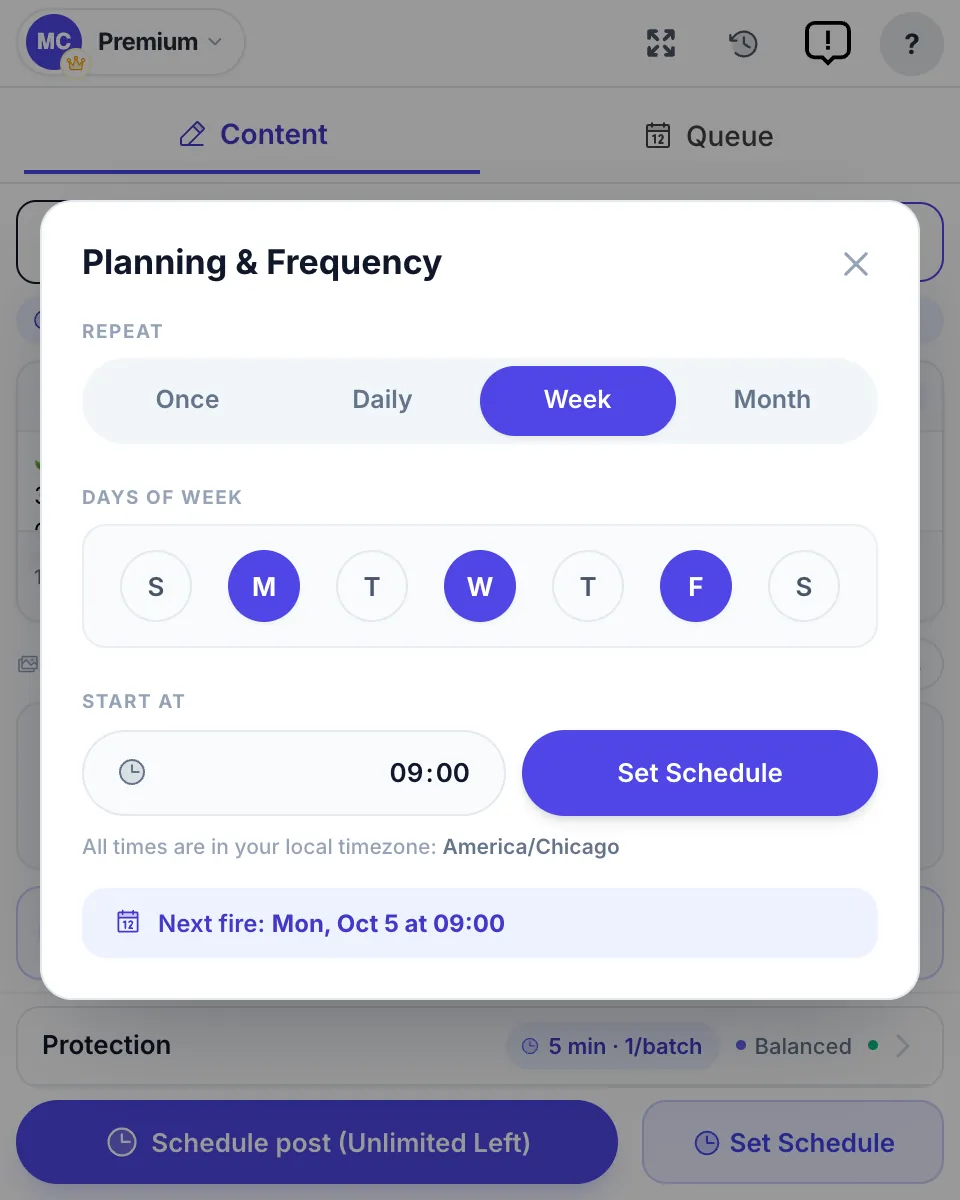
Publish now, or schedule for later
Publish Now starts right away. Set Schedule opens Planning & Frequency — see also the Facebook post scheduler.
- Choose Once, Daily, Week or Month.
- Pick the days and the start time. Times are in your computer’s time zone, and Next fire shows when it will run next.
- Click Set Schedule. The post moves to the Queue tab.
14Step 14
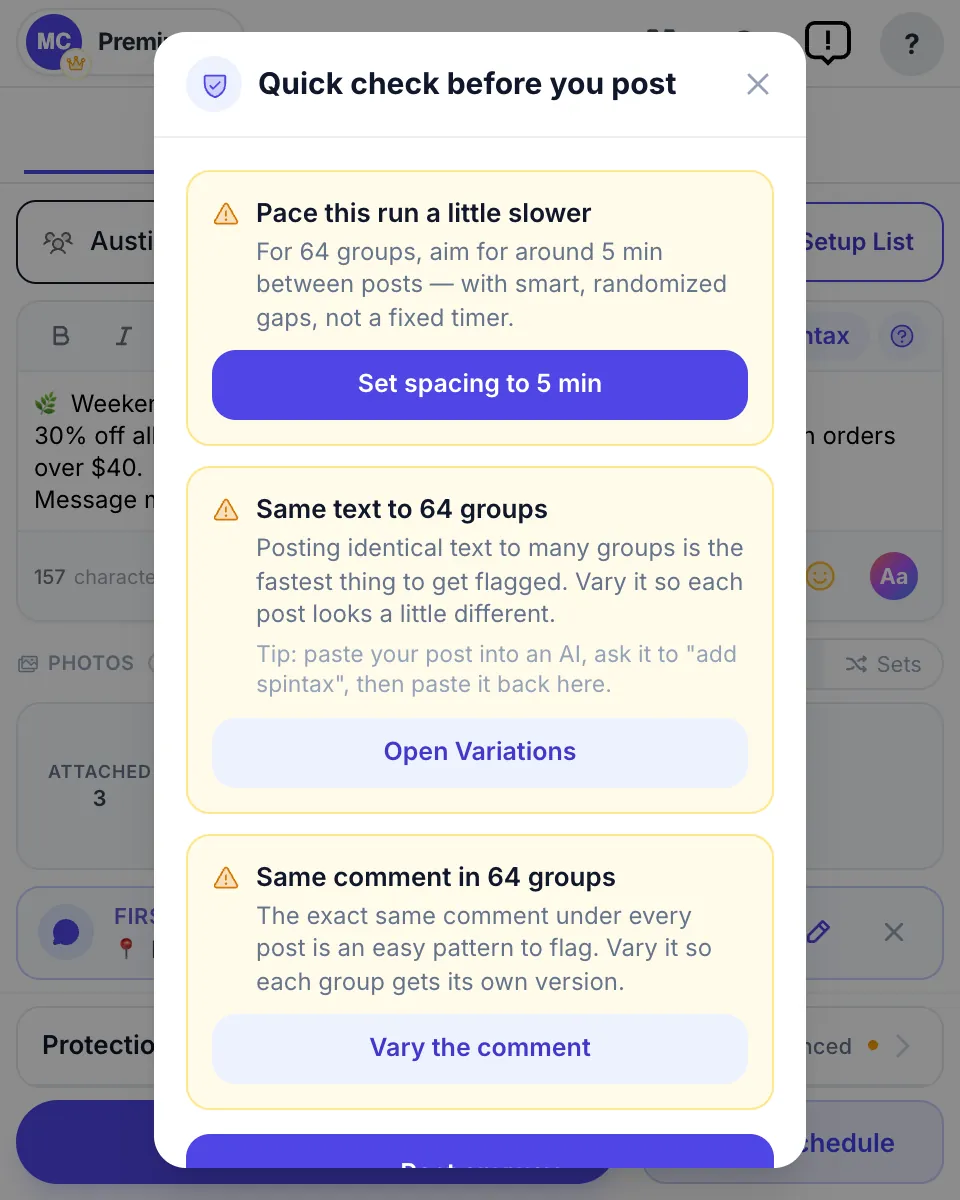
The quick check before you post
Before a big run, MultiGroupPoster looks at the run itself — how many groups, how fast, how varied the text is — and suggests a fix.
- Each card comes with a one-click fix, such as Set spacing to 5 min, Open Variations or Vary the comment.
- It also warns you when some of the groups already got a post in the last 2 hours, so you don’t send a second copy by mistake.
- It is advice, not a block: Post anyway always goes ahead.
15Step 15
Watch the campaign run
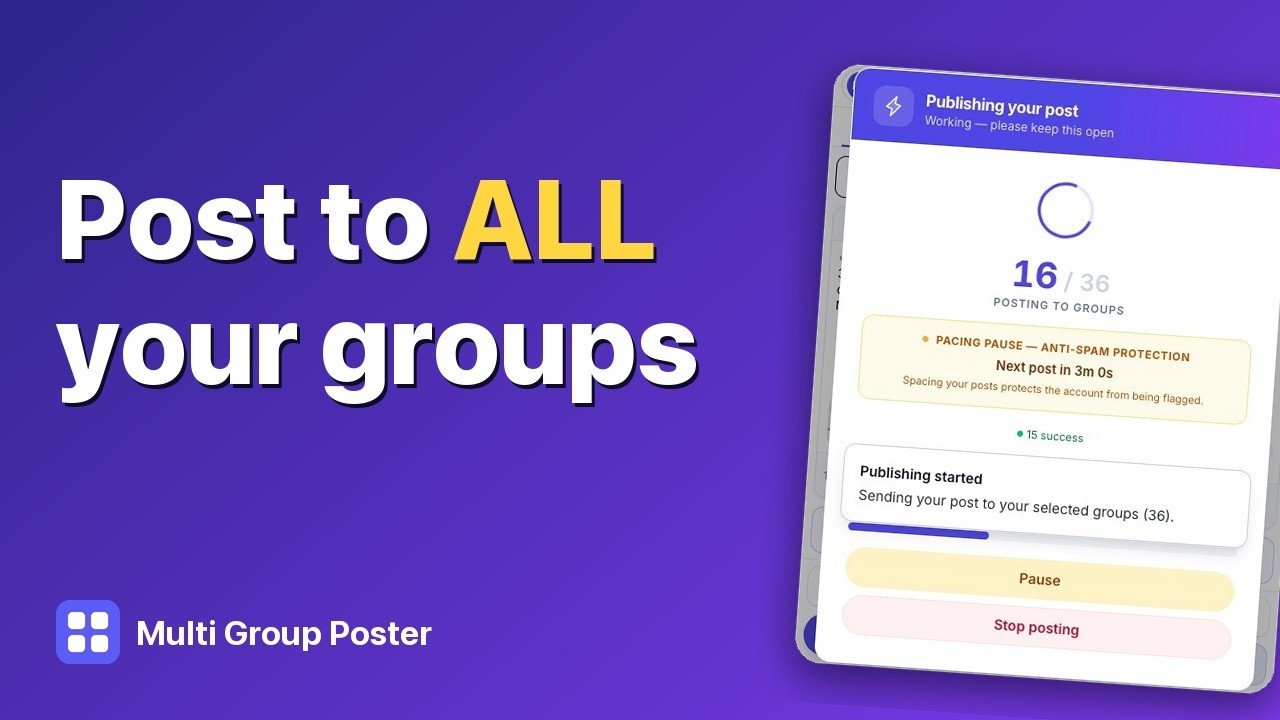
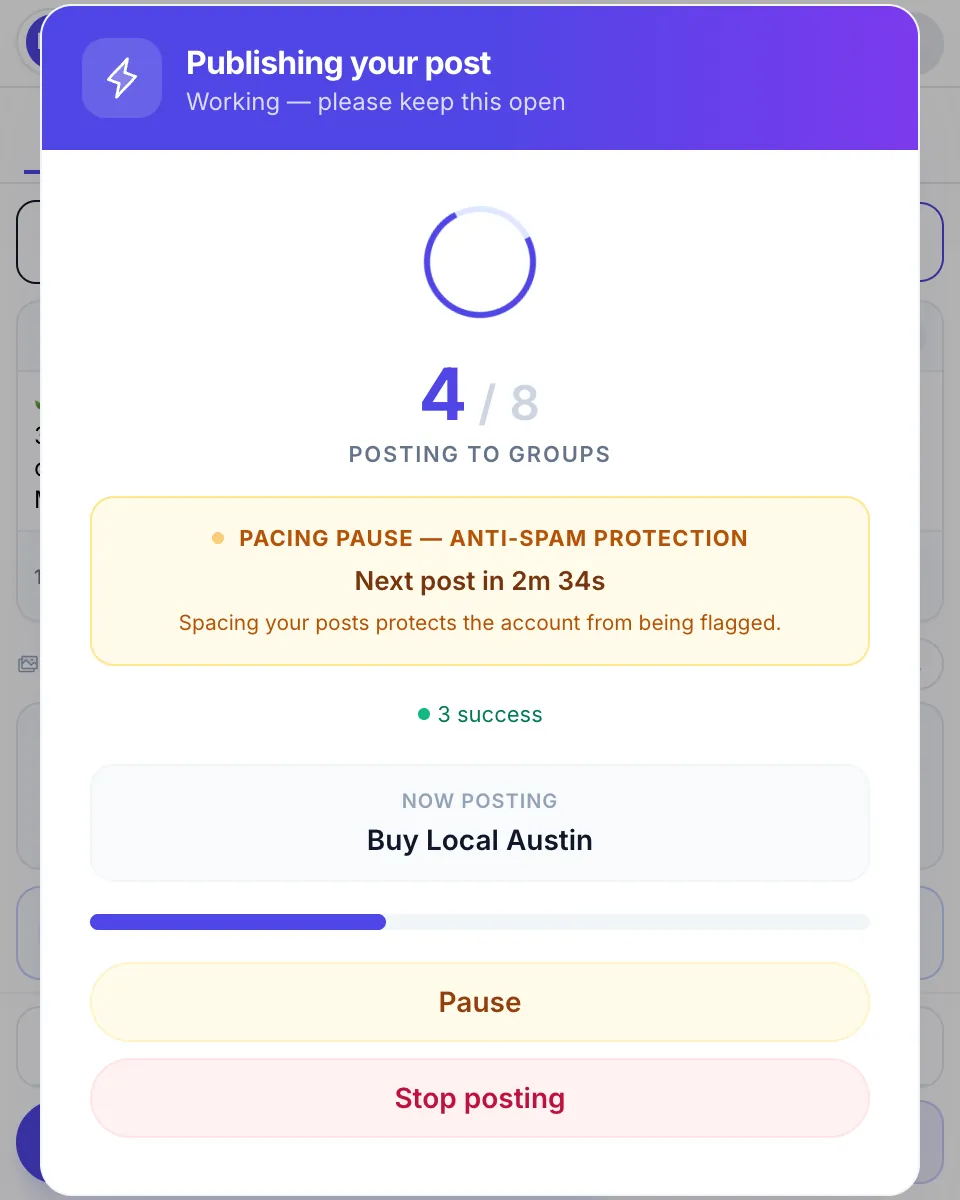
A progress window shows how many groups are done, the group being posted to right now, and the countdown to the next post.
- Pause holds the campaign between two groups; Resume posting continues exactly where it stopped.
- Stop posting ends it. Groups it didn’t reach are marked as stopped, not as failed.
- You can close the popup: the campaign keeps running. Open it again to see where it is.
16Step 16
Read the results
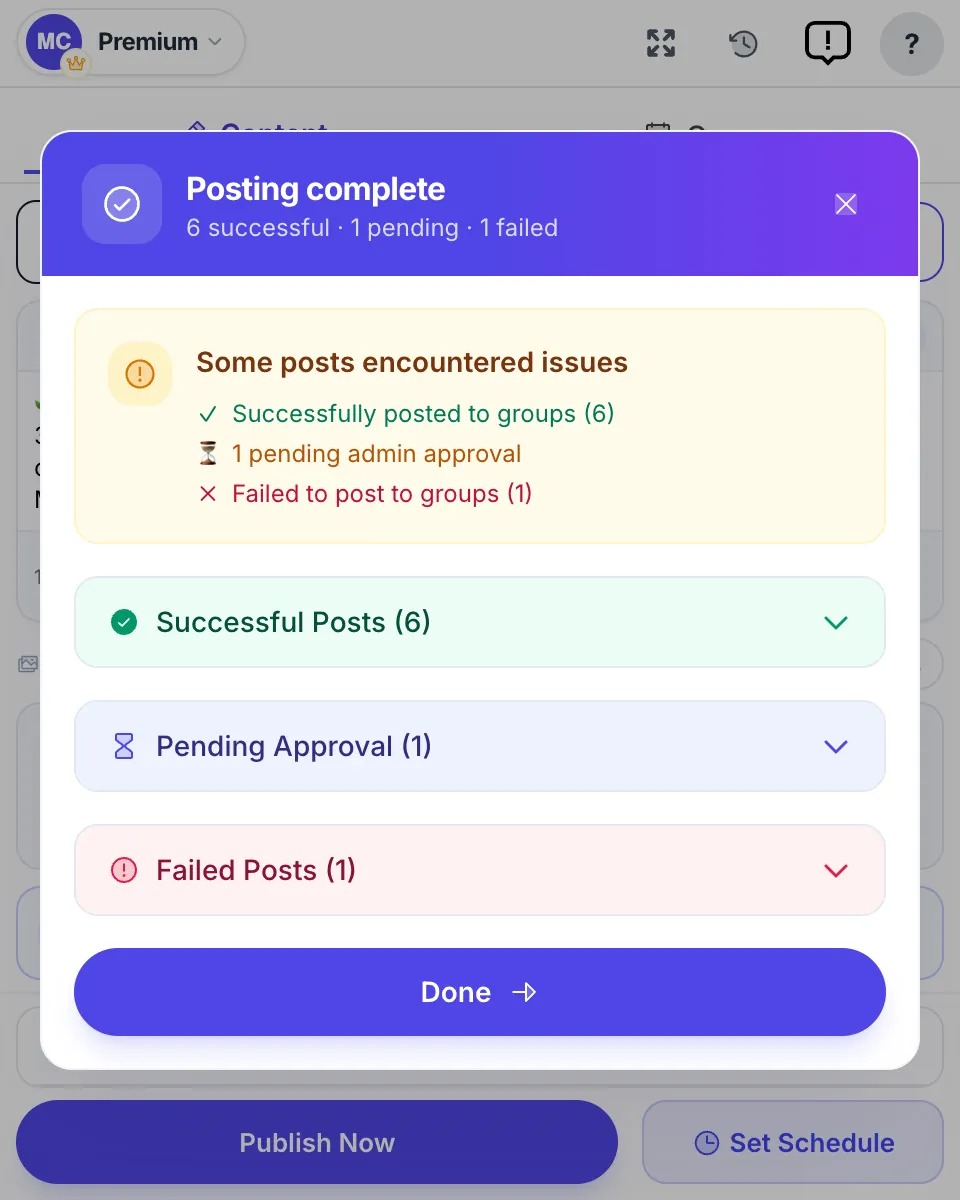
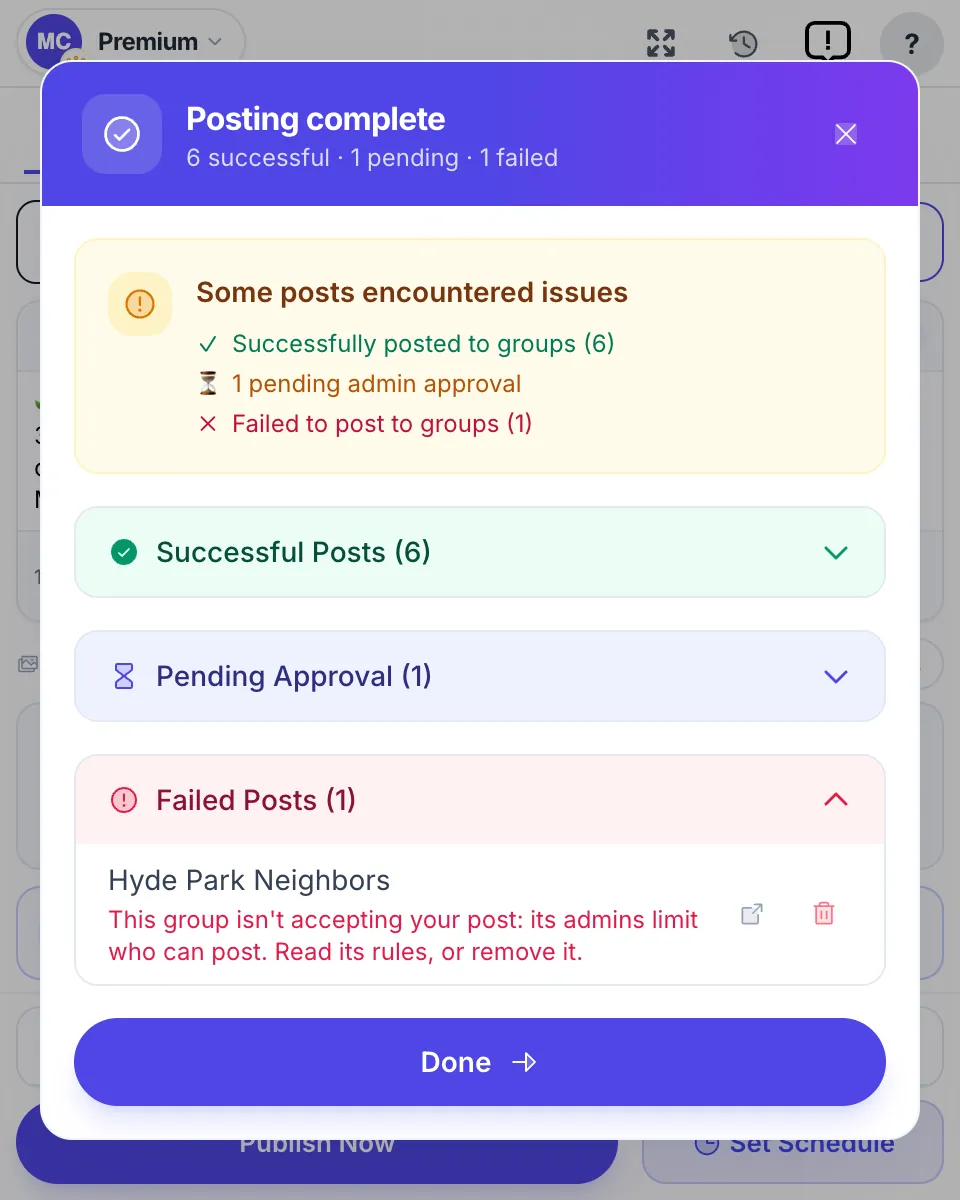
When the run ends, you see what happened in every group.
- Successful Posts are live now. Click a group to open its post on Facebook.
- Pending Approval means the group’s admins must approve the post first. Don’t post it again.
- Failed Posts each show the reason in plain words and what to do. A group that keeps refusing can be removed from your list with the trash icon.
17Step 17
Manage scheduled posts in the Queue
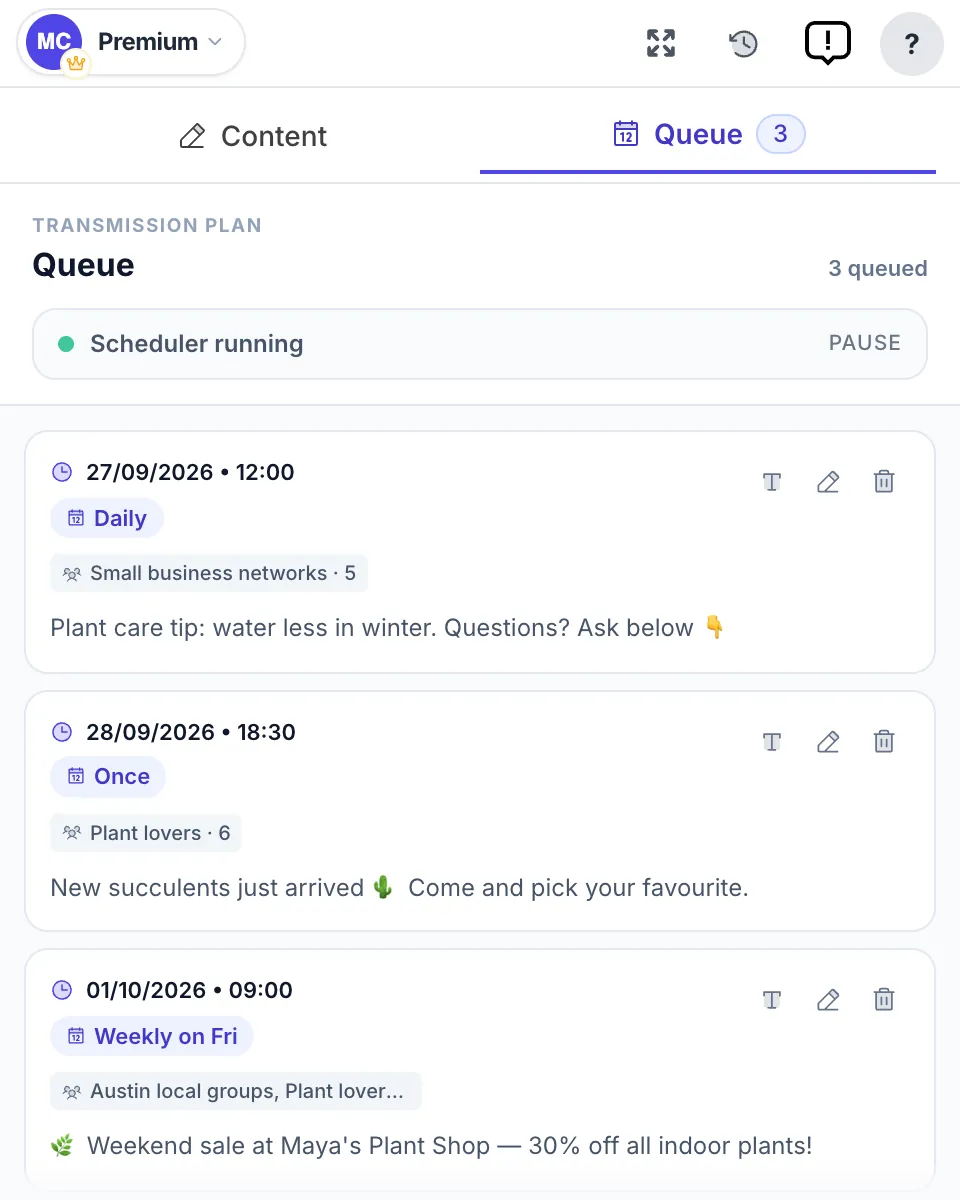
The Queue tab lists every scheduled post with its next date and time, how often it repeats and the lists it goes to.
- Edit the text or the schedule, or delete a post, with the icons on its right.
- Pause at the top holds every scheduled post until you resume. Nothing is lost.
18Step 18
Post history: every campaign, every group
Click the clock icon at the top to open Post history.
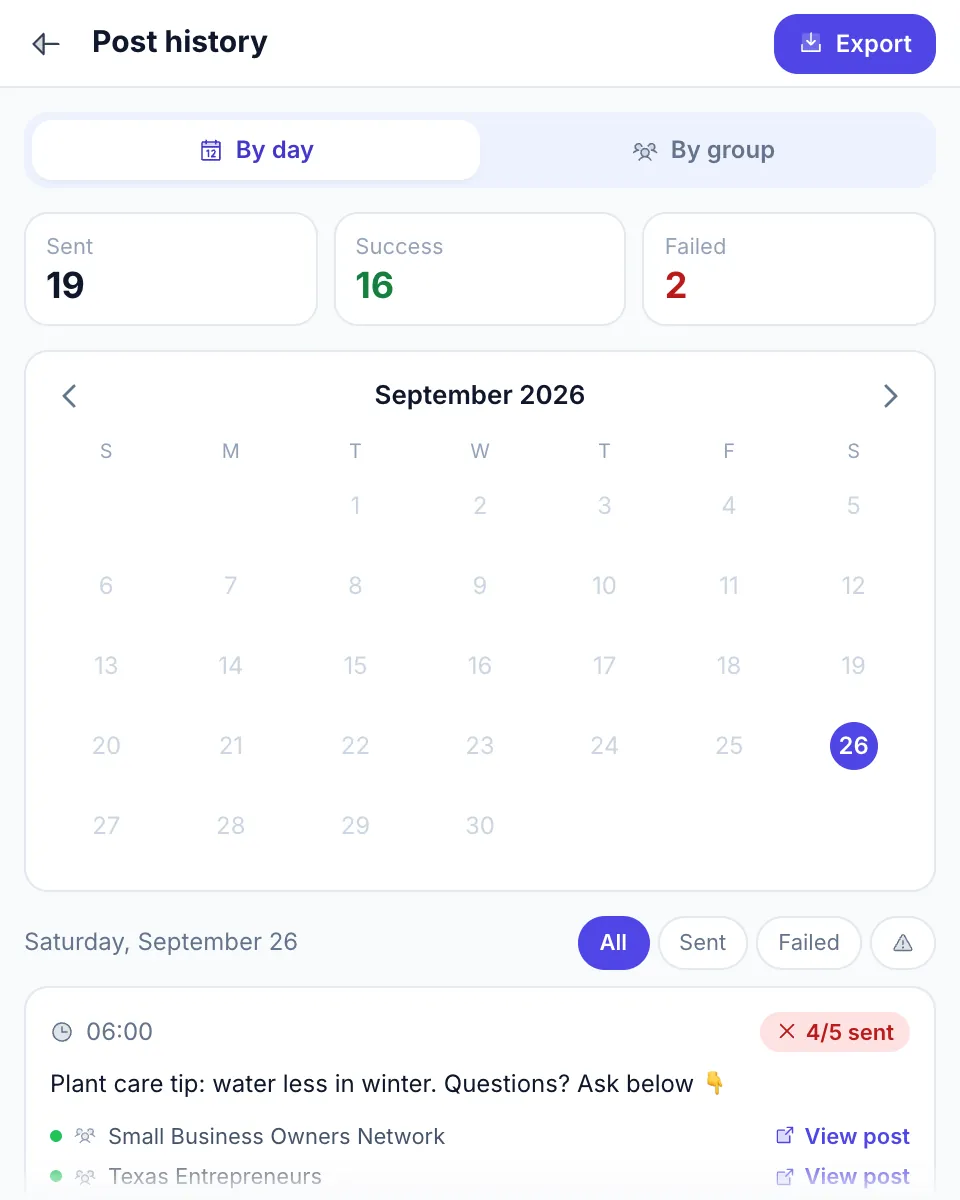
- See the totals — Sent, Success, Failed — a calendar, and every campaign of the day you pick.
- Every group shows its result: View post opens the live post, and a failed group shows why.
- Switch to By group to see how each group has done over time, and use Export to save your history as a file.
19Step 19
Share an existing Facebook post to your groups
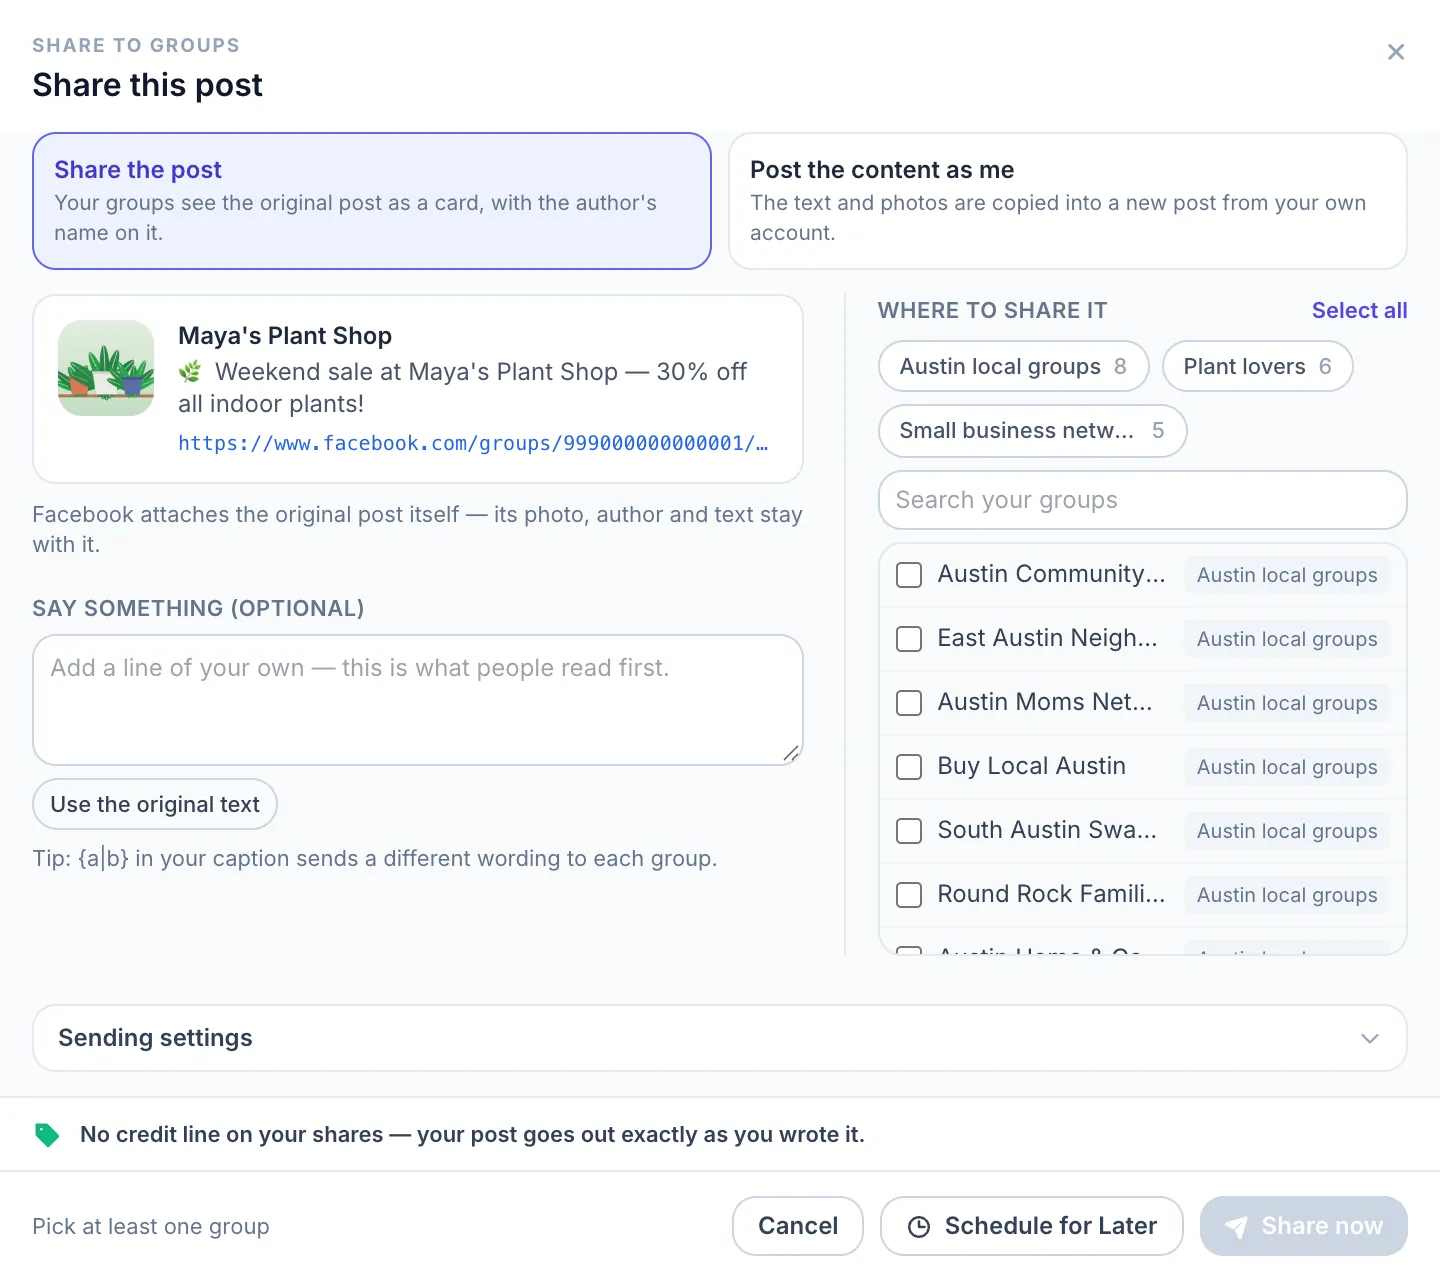
Found a post worth sharing — yours or a Page’s? You can share it to your groups straight from Facebook. Here is how to share one post to many groups.
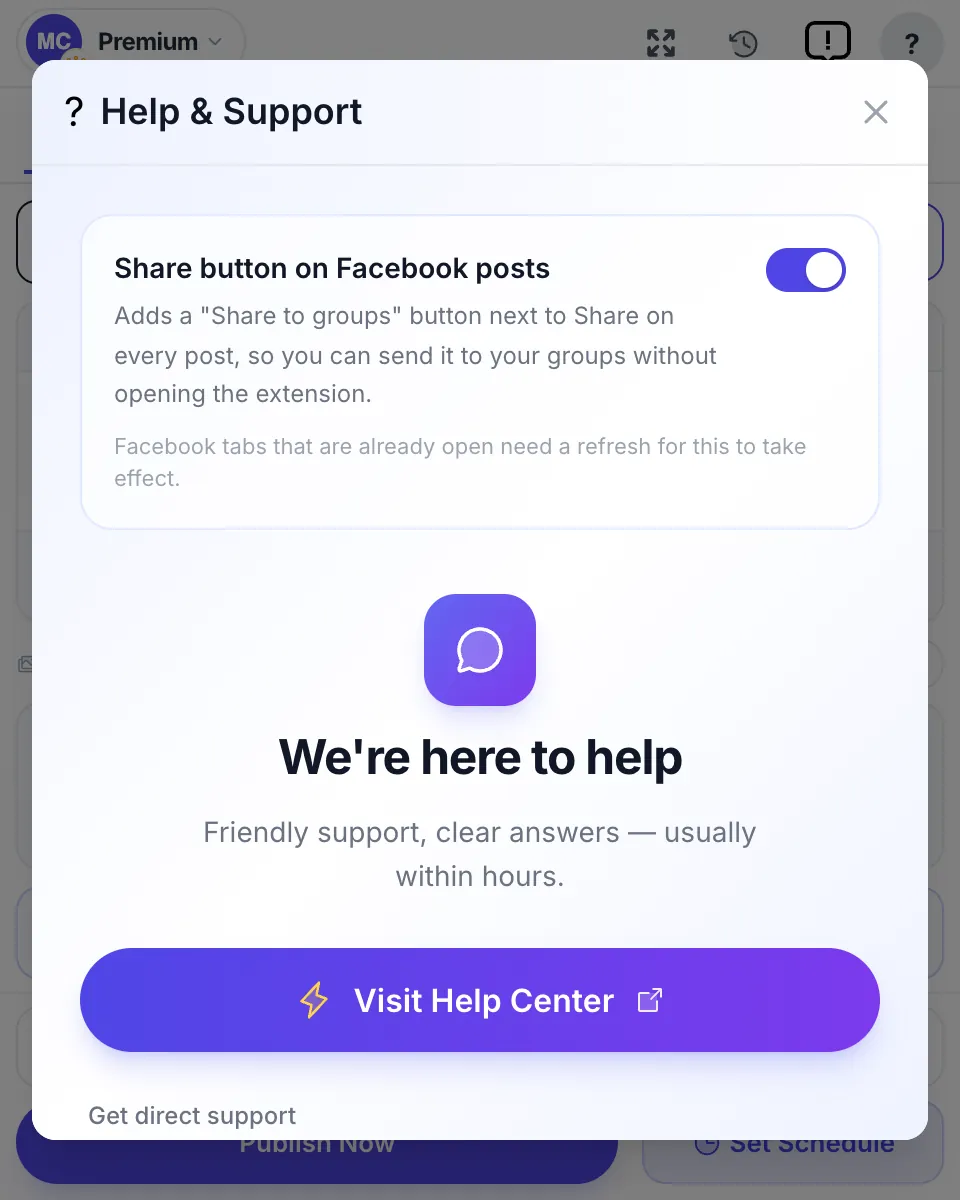
- On Facebook, click Share to groups — the button MultiGroupPoster adds next to Facebook’s own Share button under each post.
- Pick Share the post — your groups see the original as a card — or Post the content as me, a new post from your account (only with the author’s permission).
- Tick the lists or groups, add a line of your own if you like, then click Share now or Schedule for Later.
20Step 20
If Facebook stops a campaign
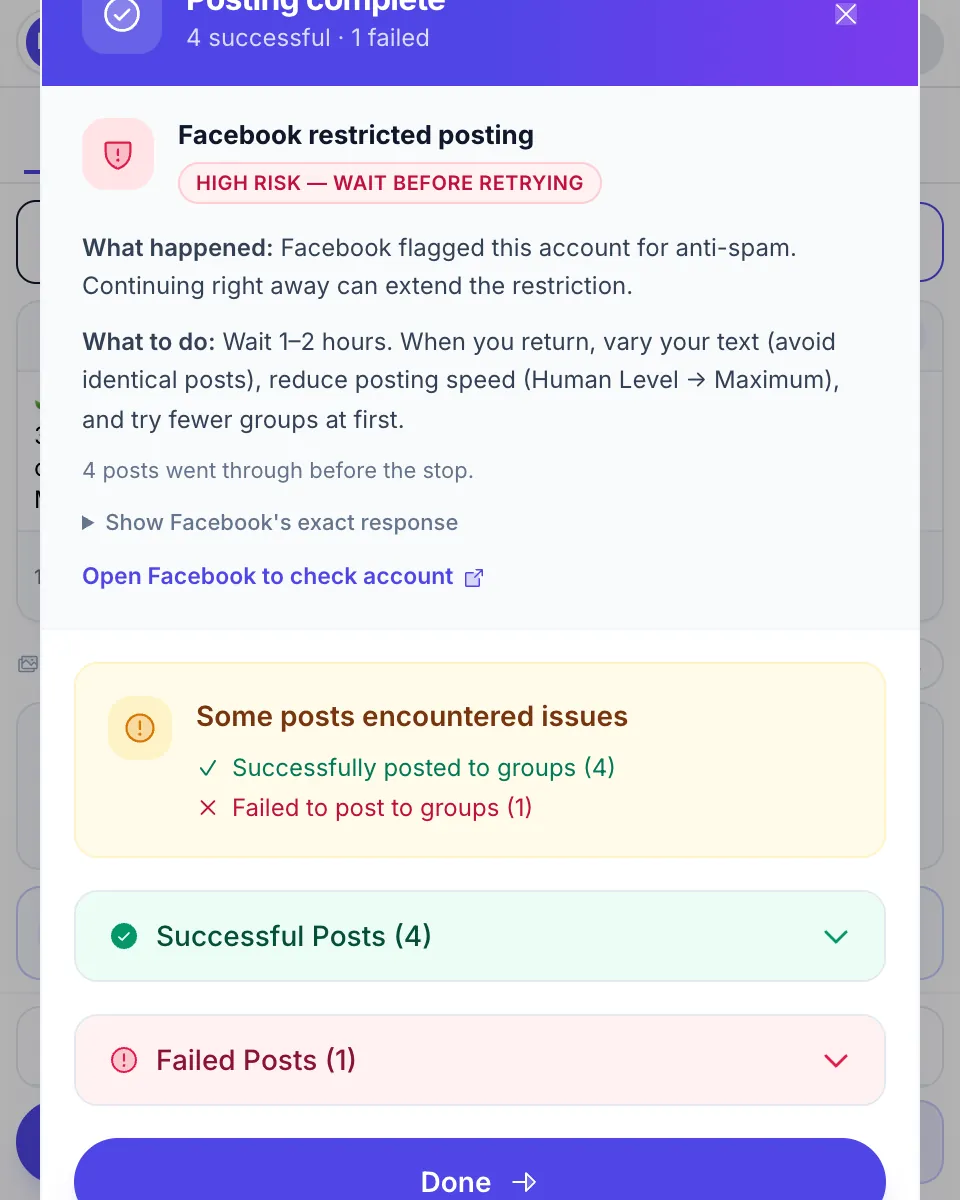
When Facebook limits an account, MultiGroupPoster stops the campaign instead of pushing on, and tells you what happened.
- Read What happened and What to do on the card. Usually: wait 1–2 hours, vary your text, slow the pace and post to fewer groups.
- Show Facebook’s exact response reveals the technical message, for support.
- Signed out of Facebook, or asked for a security check? Open Facebook, finish the check, then run the campaign again.
How to post safely — our recommendation
- Start with the amount you already post by hand.
- Grow by 10–15% every 1.5–2 weeks — not faster.
- Keep at least 3 minutes between groups, or leave smart pacing on.
- Posting to many groups? Use Safe mode.
- Vary your text with Spintax, and put links in the first comment.
You’re ready for your first campaign
Start with a small list you know well, check the results, then grow from there. Questions? The answers below cover the usual ones.
Add MultiGroupPoster to ChromeFrequently asked questions
How do I post to multiple Facebook groups at once, safely?
What is Spintax and how does it help account safety?
How long does the initial MultiGroupPoster setup take?
Do I need to enter my Facebook password to use MultiGroupPoster?
Why isn't my post publishing to a specific Facebook group?
How many Facebook groups can I post to per day safely?
Can I schedule a MultiGroupPoster campaign for later?
Is MultiGroupPoster free?
Does MultiGroupPoster work on Mac, Windows, Edge, and Brave?
What should I do after my first campaign finishes?
What does ✗ Failed mean in the Post Progress Summary, and how do I recover?
How do I pause or edit a scheduled campaign before it runs?
Why did my campaign halt mid-run, and what does AUTH / WARNING / CRITICAL mean?
Can MultiGroupPoster post to my Facebook Pages, not just groups?
MultiGroupPoster is an independent tool and is not affiliated with Meta or Facebook. Post only where the group’s rules allow it.
Reclaim 7 hours every week.
Starting in the next 5 minutes.
Join marketers who replaced 2 hours of daily clicking with one click.
Free tier · No credit card · 14-day money-back guarantee on Pro